New Features for 8-9
Lighting
Fixtures:
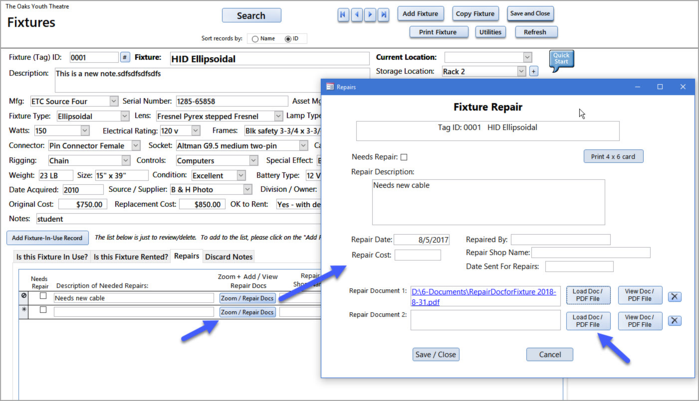
1) For each Repair record you can add up to 2 PDF or Word/Excel documents. You load the document name just like you load a photo. To view the document click on the View Document button.
2) The Serial Number and Asset Management ID must be unique. If you enter a number that is already in the table you will get a message to tell you to enter a different one. If for some reason you are using the same Serial Number or Asset Management ID for multiple records - then you will need to add an extra letter/digit to the end. If the original # is 12345 - the copies will need to be 12345_1, or 12345a, etc.
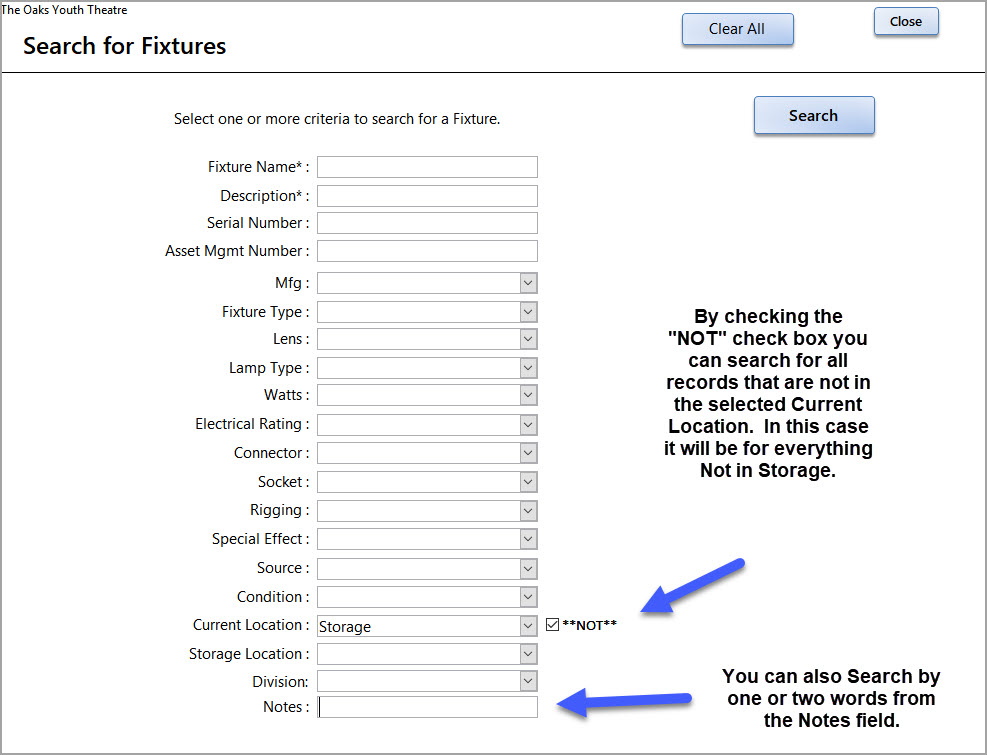
3) On the Search for Fixtures screen you can select to search using the "Not" condition for the "Current Location" field. You can search for everything that is " NOT Checked Out" or "NOT Storage". You can also search for one or two words from the "Notes" field.
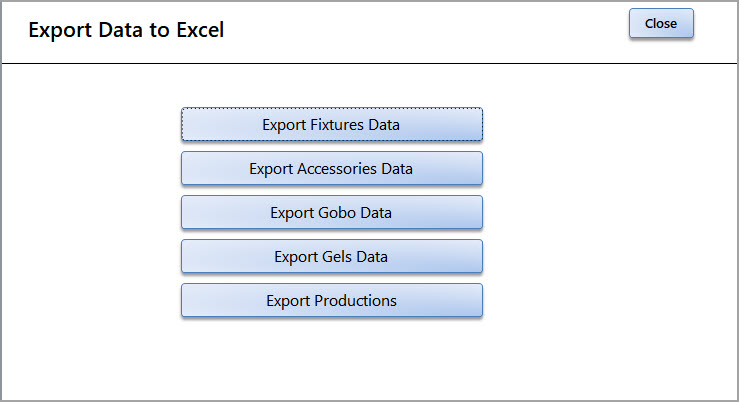
4) The Export to Excel has been updated with Export functions for Fixtures, Accessories, Gobos, Gels and Productions.
5) Rentals:
a. On the Lighting Rentals page - you will be prompted to enter a 'Return Due Date' for the rental before printing the Receipt.
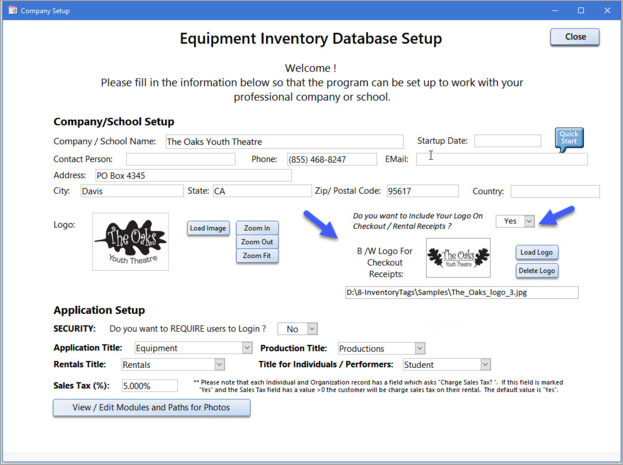
b. You have the option to print a logo on the rental receipts.
1) Go to the Company Information form on the Main Utilities menu.
You will see a question: Do you want to include Your Logo on the Checkout/Rental Receipts? Yes/No. If you want to include the logo, click on the Yes. The Load a Black and White Logo. You may need to try one or two logos to see which one prints the best.
The next receipt you print will have the logo on the upper left corner.
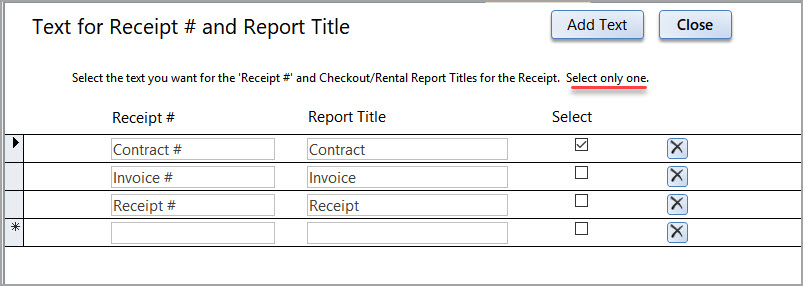
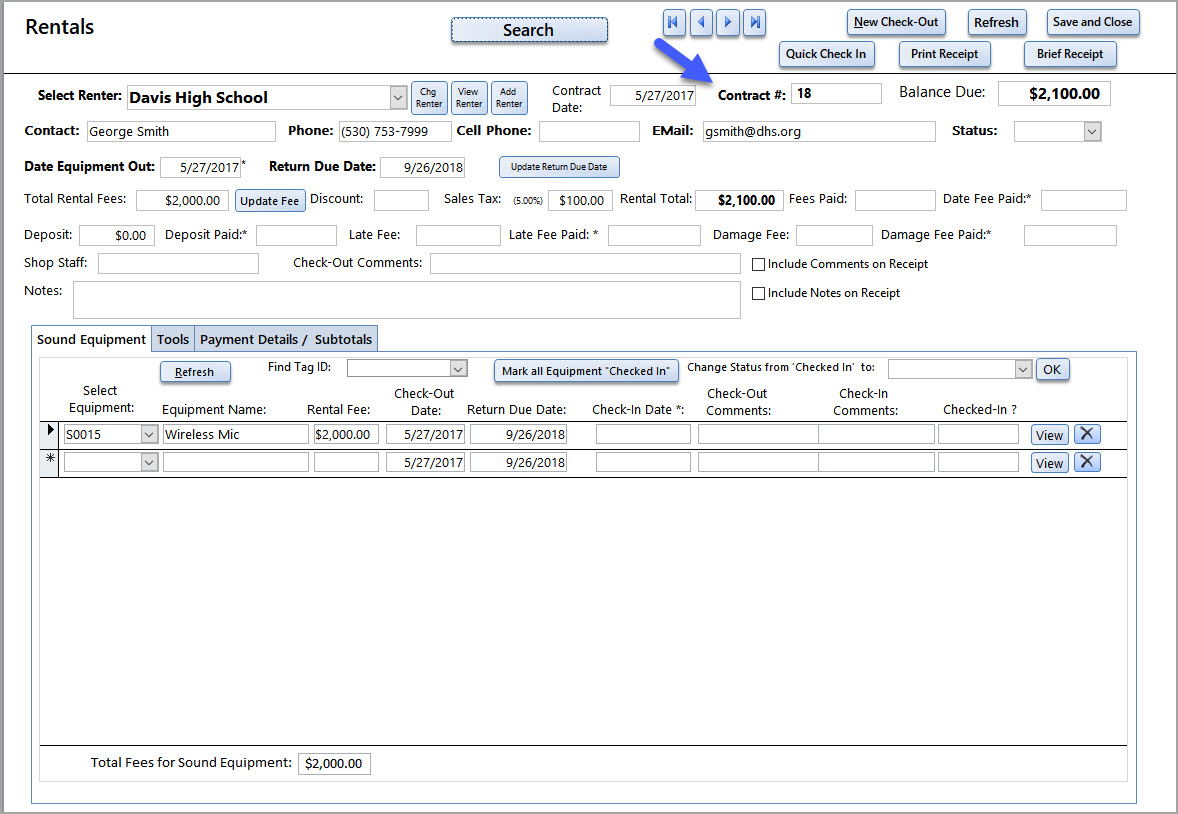
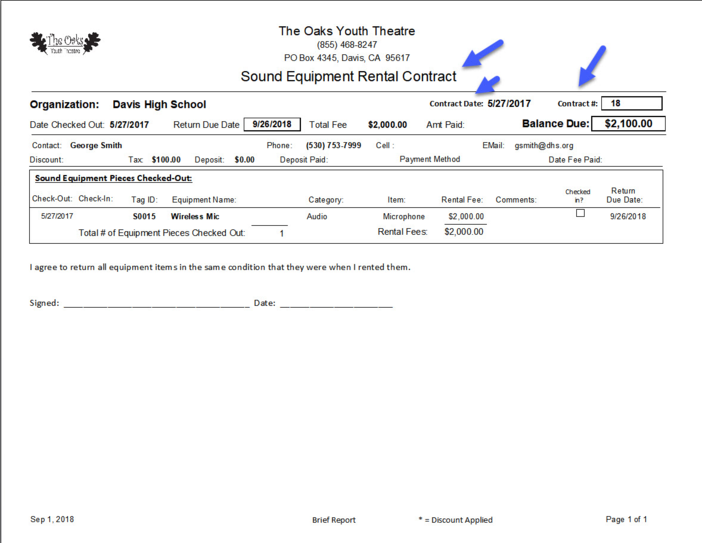
c. You can change the title of the Rental Receipt # and report title. See example in the Sound Equipment updates below.
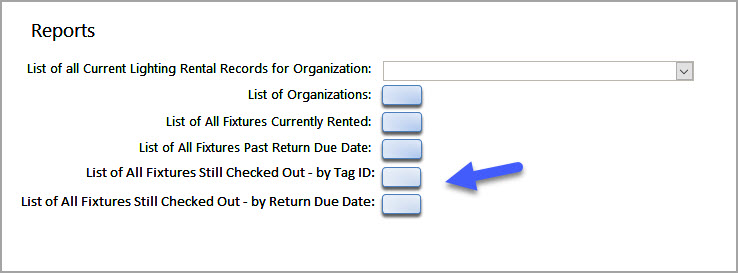
d. There are 2 new reports of Lighting Fixtures Still Checked Out - by Tag ID and by Return Due Date.
Sound
1) Sound Equipment Form: The Serial Number and Asset Management ID must be unique. If you enter a number that is already in the table you will get a message to tell you to enter a different one. If for some reason you are using the same Serial Number or Asset Management ID for multiple records - then you will need to add an extra letter/digit to the end. If the original # is 12345 - the copies will need to be 12345_1, or 12345a, etc.
2) Sound Equipment Repair: There are two new fields that can hold a link to PDF (*.pdf) or Word/Excel Doc (*.doc) with repair invoices or other documents. You link the file(s) and you can view them from the Repair Zoom screen.
3) On the Search for Sound Equipment screen you can select to search using the "Not" condition for the "Current Location" field. You can search for everything that is " NOT Checked Out" or "NOT Storage". You can also search for one or two words from the "Notes" field.
4) A new Export To Excel feature for Sound/MM Equipment has been added to the Sound Equipment Utilities menu.
5) Rentals:
a. On the Sound Equipment Rentals page - you will be prompted to enter a 'Return Due Date' for the rental before printing the Receipt.
b. You have the option to print a logo on the rental receipts.
1) Go to the Company Information form on the Main Utilities menu.
You will see a question: Do you want to include Your Logo on the Checkout/Rental Receipts? Yes/No. If you want to include the logo, click on the Yes. The Load a Black and White Logo. You may need to try one or two logos to see which one prints the best.
The next receipt you print will have the logo on the upper left corner.
c. You can change the text for the word 'Receipt' on the Rental form and the Rental receipts.
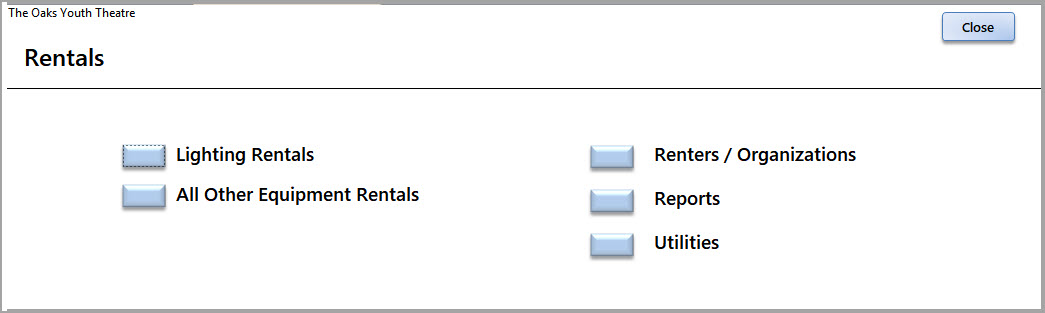
Go to the Rentals menu and Select "Utilities"
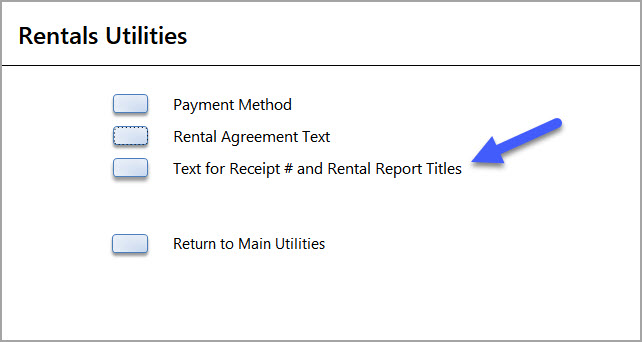
Select "Text for Receipt # and Rental Reports Titles"
The the "Text for Receipt #" form you may select one of the choices listed or add your own title. Be sure to only "Select" on title as the first one checked with be used.
See the new title for "Receipt" - Now it says Contract because of the title selected above.
See the updated text on this receipt:
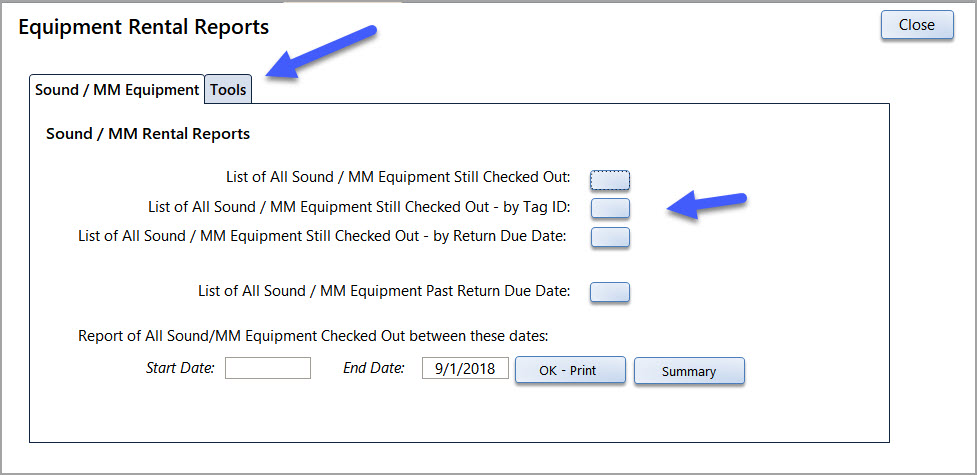
e. The Sound Equipment and Tools Rental Reports are now split on two tabs on the Rental Reports menu. If you only have the Sound Equipment module you won't see the Tools tab.
There are 2 new reports to list the Sound (Tools) that are still checked out - by Equipment Tag ID and by Return Due Date. These reports are condensed to make them easier to find equipment that is still out.
Tools
1) Tools/Equipment Form: The Serial Number and Asset Management ID must be unique. If you enter a number that is already in the table you will get a message to tell you to enter a different one. If for some reason you are using the same Serial Number or Asset Management ID for multiple records - then you will need to add an extra letter/digit to the end. If the original # is 12345 - the copies will need to be 12345_1, or 12345a, etc.
2) Tools/Equipment Repair: There are two new fields that can hold a link to PDF (*.pdf) or Word/Excel Doc (*.doc) with repair invoices or other documents. You link the file(s) and you can view them from the Repair Zoom screen.
3) On the Search for Tools screen you can select to search using the "Not" condition for the "Current Location" field. You can search for everything that is " NOT Checked Out" or "NOT Storage". You can also search for one or two words from the "Notes" field.
4) A new Export To Excel feature for Tools/ Equipment has been added to the Tools/ Equipment Utilities menu.
5) Rentals:
a. On the Sound Equipment Rentals page - you will be prompted to enter a 'Return Due Date' for the rental before printing the Receipt.
b. You have the option to print a logo on the rental receipts. See the screen above for information on setting up the Logo.
c. You can change the title of the Rental Receipt # and report title. See example in the Sound Equipment updates above.
d. The Sound Equipment and Tools Rental Reports are now split on two tabs on the Rental Reports menu. If you only have the Sound Equipment module you won't see the Tools tab.
There are 2 new reports to list the Sound (Tools) that are still checked out - by Equipment Tag ID and by Return Due Date. These reports are condensed to make them easier to find equipment that is still out.
New Features for 8-7
In 8-7 there are many changes to the Lighting and Sound Equipment Modules.
Lighting:
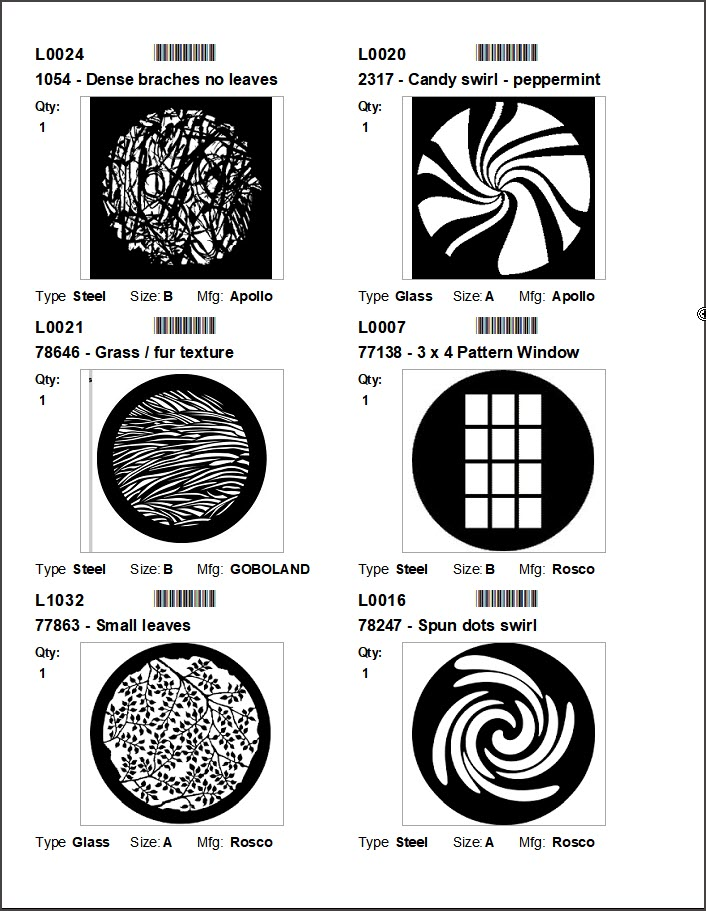
1) Gobos -
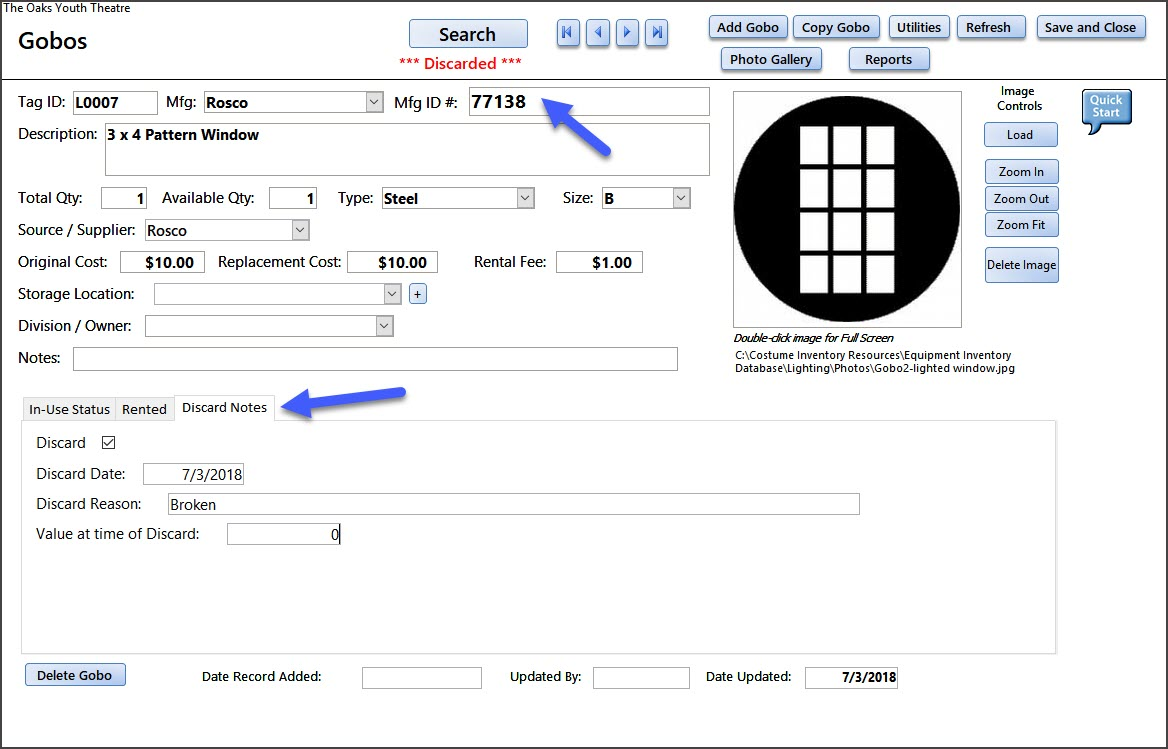
a. New Fields:
The Mfg ID # and Discard fields have been added. The arrangement of the fields has been slightly altered. The Mfg name has been moved up to the top and the Mfg ID# has been added. The Discard fields (Discard, Discard Date, Discard Reason and Value at time of Discard) have been added. Discarded Gobos will not show up in reports or searches.
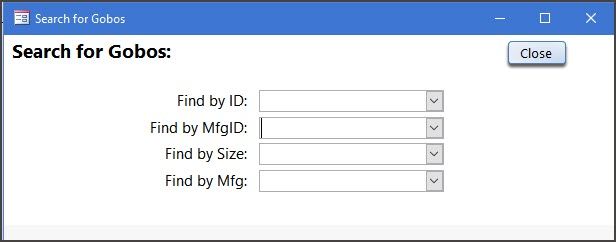
The Search for Gobos has be modified to add a Search by Mfg and Mfg ID:
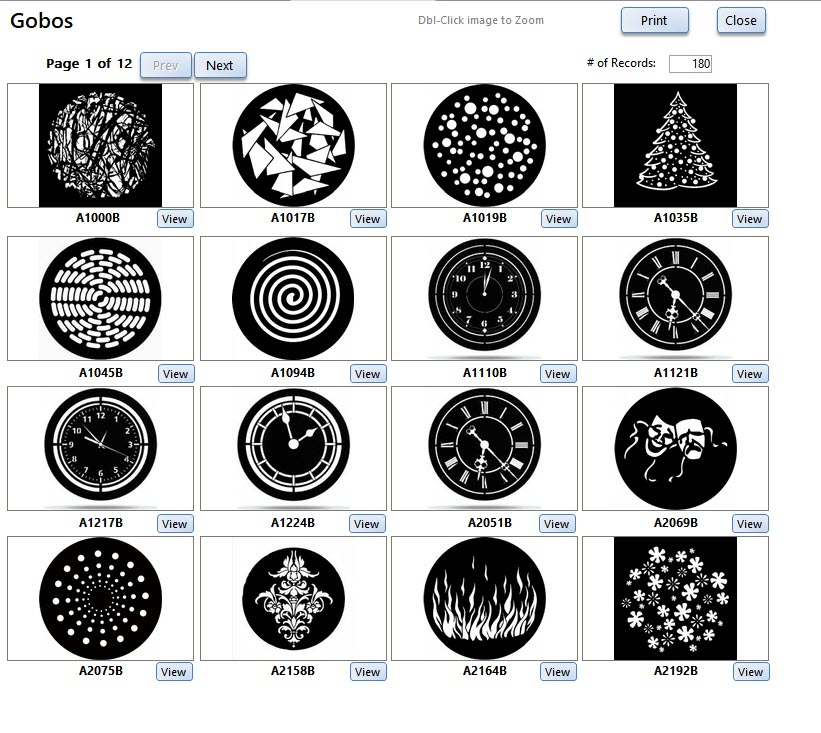
b. The Gobo Photo Gallery has been fixed so the Next and Prev (Previous) buttons work to move you through the collection of Gobo Photos.
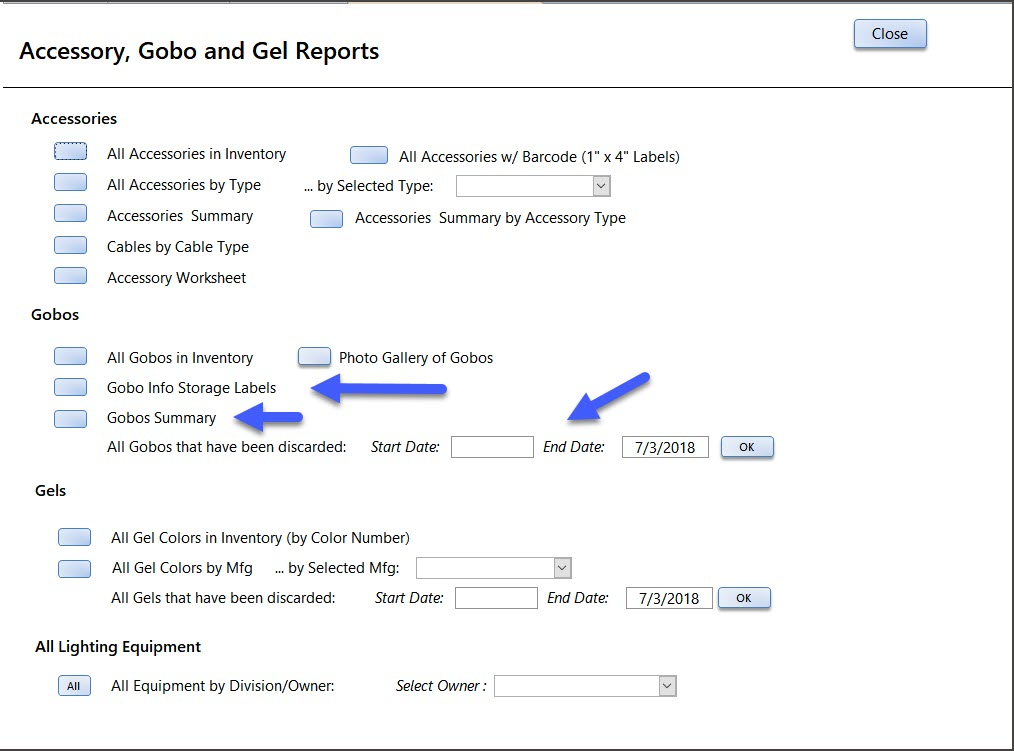
c. Three new Gobo reports has been added -
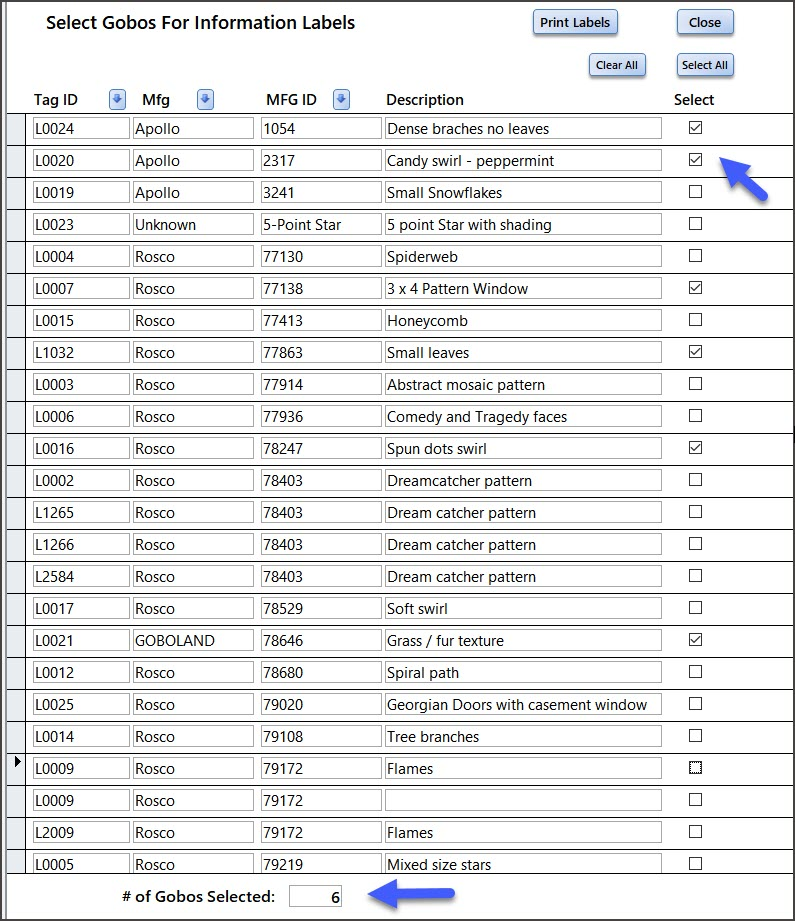
Gobo Info Storage Labels - these are labels to print on Avery #5164 (3 1/3" x 4") labels to go on the front of an envelope of box holding the Gobo. You may select which Gobos to print from this screen first. You can see in this example that 6 gobos have been selected.
The report will print 6 labels per page. It includes the Gobo ID, Barcode, Mfg ID, Description, Qty, Type, Size and Manufacturer.
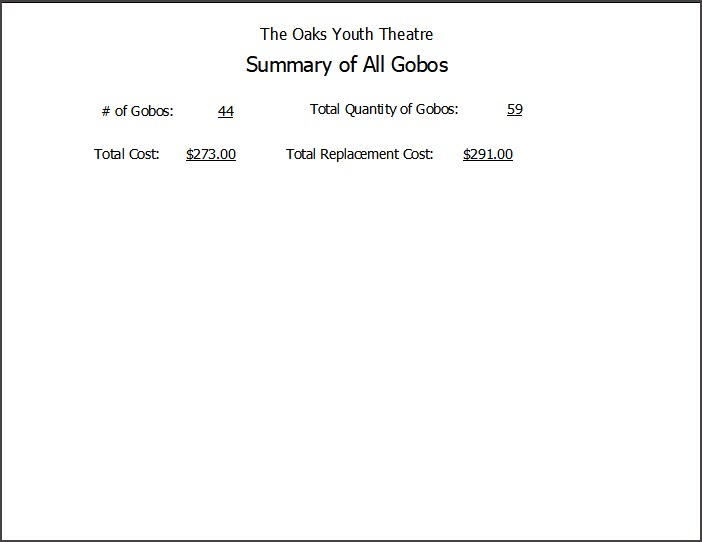
Gobo Summary report - this is a count of the Gobos and the Total Quantity (if there are more than one of a particular gobo), the total cost to purchase and the total replacement cost.
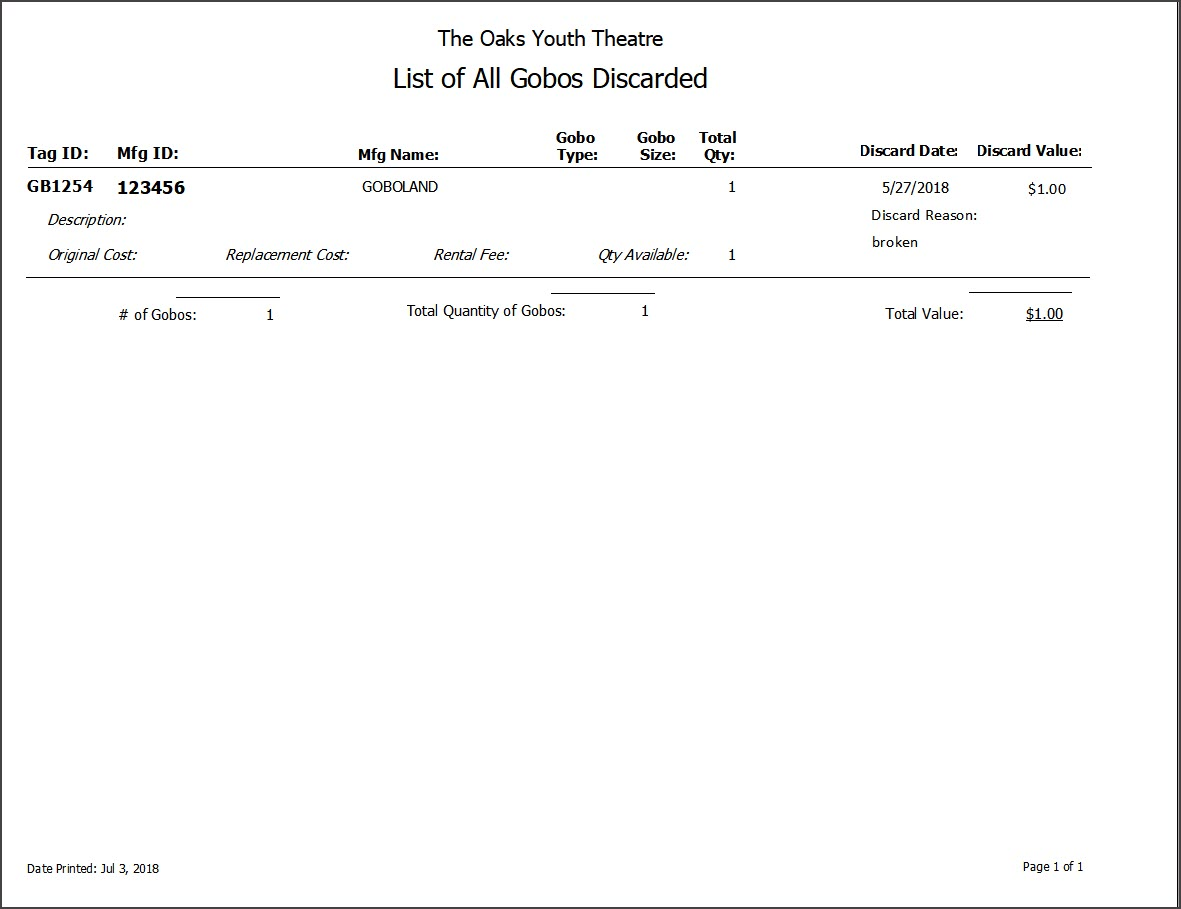
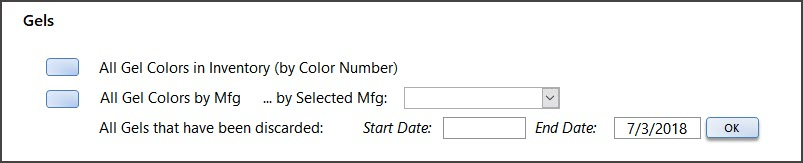
Gobo Discard Report - Gobo's that have been discarded can be listed. Enter the Start and End dates for the Discards.
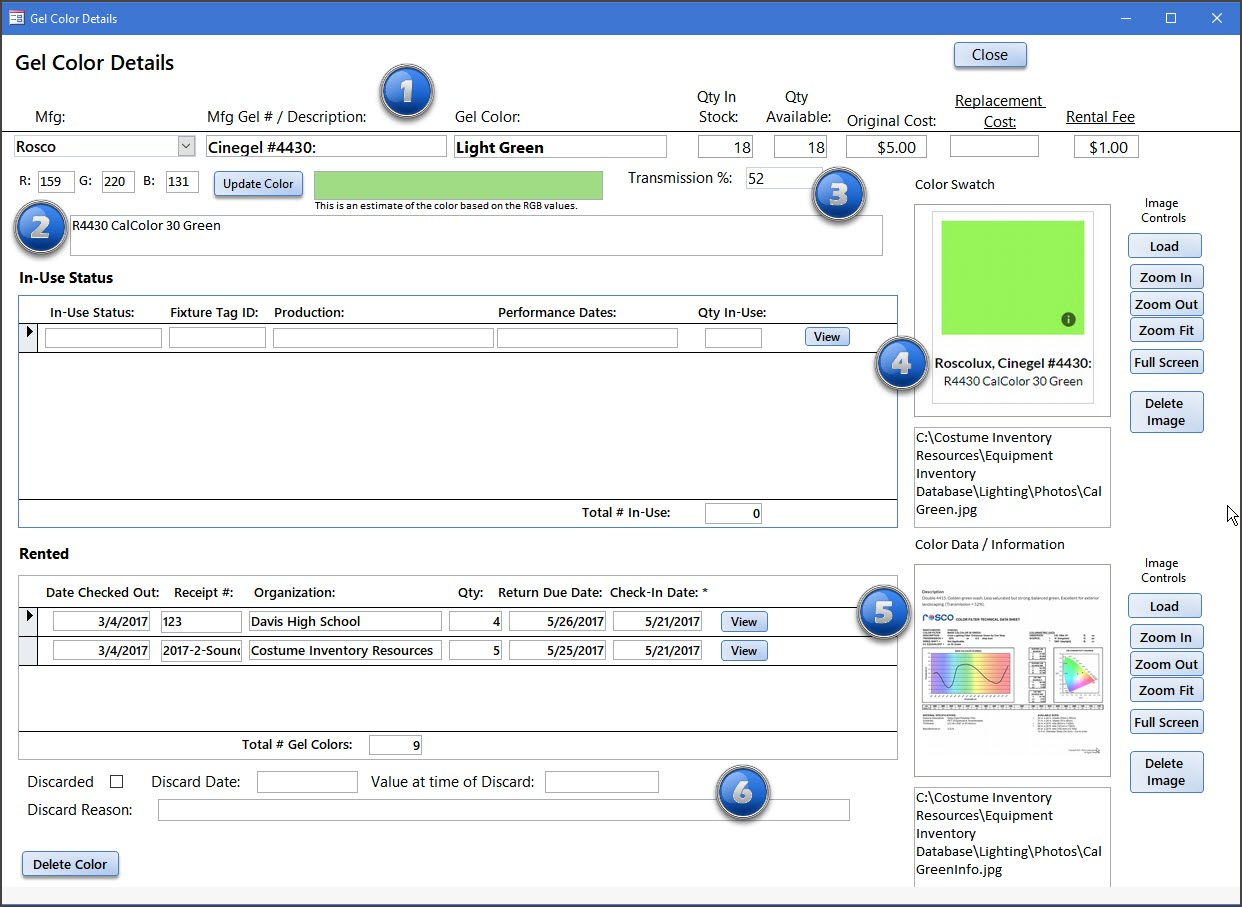
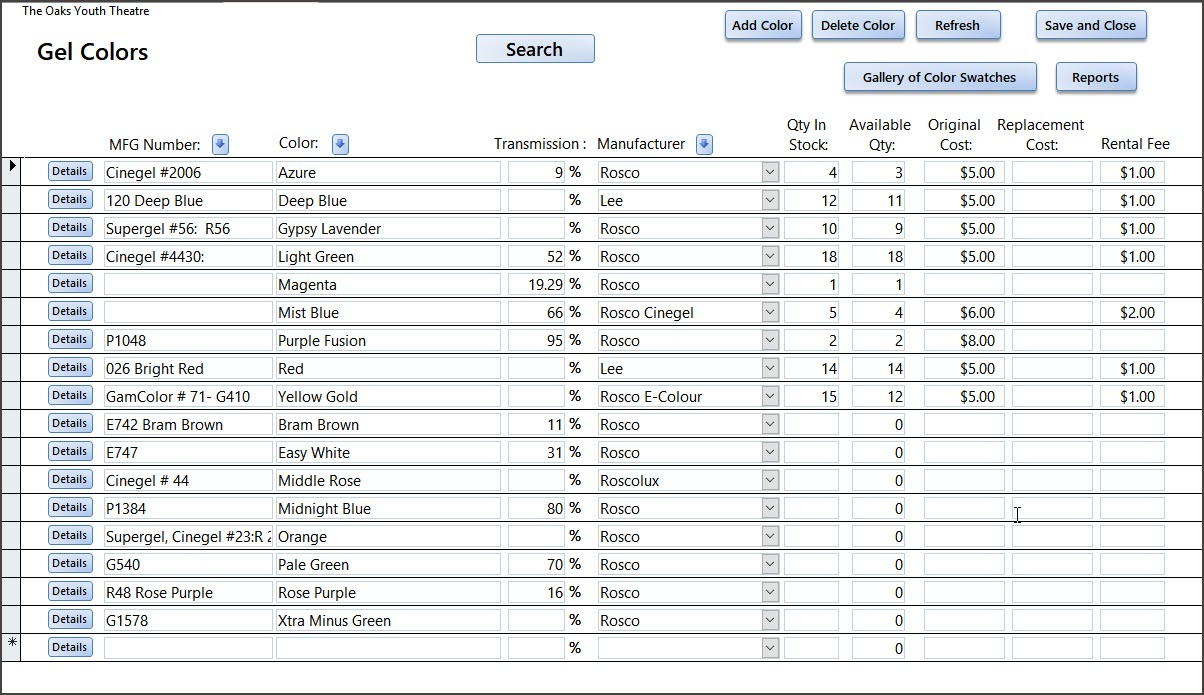
2) Gel Colors -
a) The Gel Color screen has several new fields:
1) The Mfg Gel Number field can be entered right at the top
2) The RBG values can be entered and the color value will be estimated
3) The Transmission %
4) Color Swatch - You can make a screen print of the color swatch from the manufacturer's website and load it as a photo (like you would for a fixture photo)
5) Color Data - You can make a screen print of the color data from the manufacturer's website and load it.
6) Discard - The Discard, Discard Date, Value, and Discard Reason fields have been added.
The Gel Color List has also been updated to include a few of these fields:
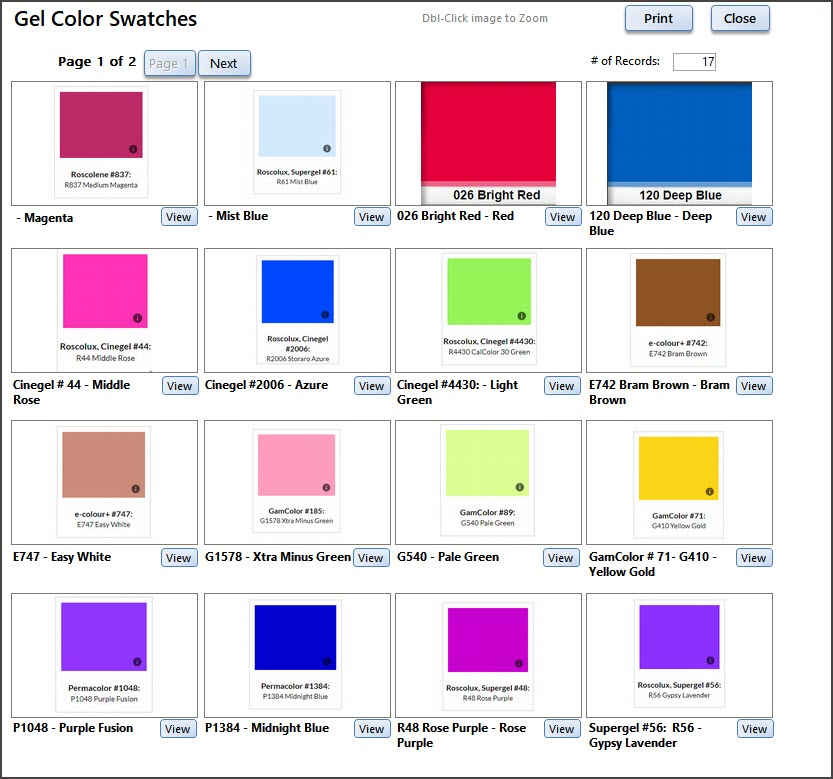
There is also a Photo Gallery of Color Swatches available from the Gel Color List. As with all Photo Galleries, you can print (to a printer or PDF) the colors as well.
The Gel Color Reports have been updated to include a report of all Discarded Gel Colors.
Sound Equipment Updates:
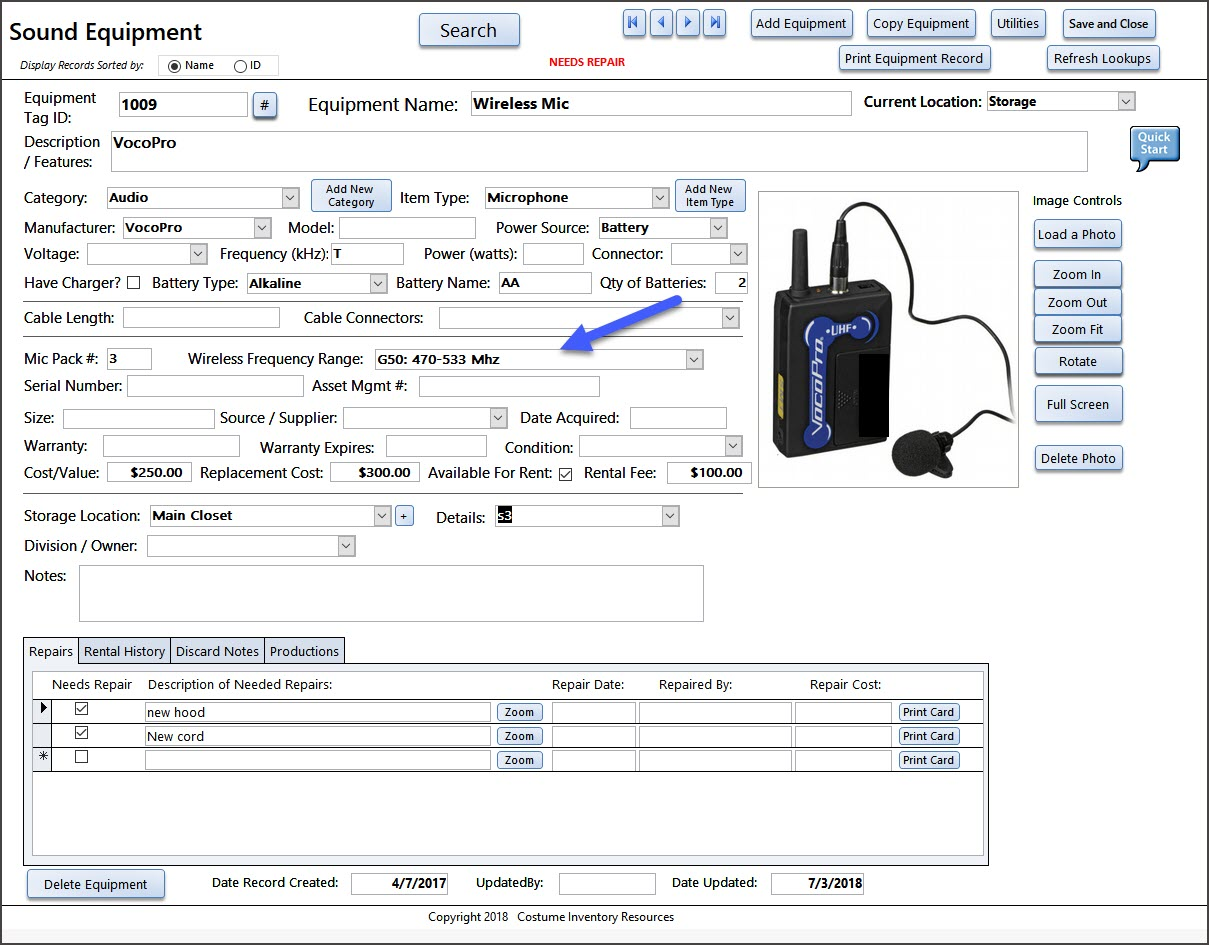
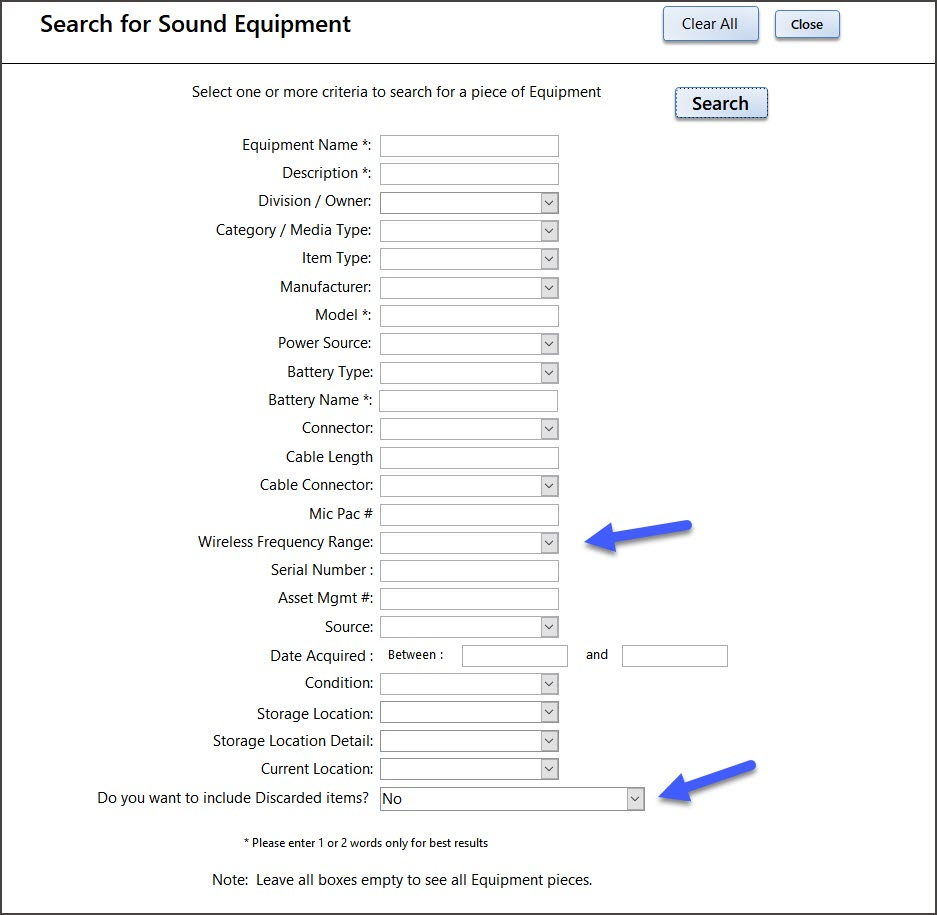
Sound Equipment record has a new field for wireless mics - Wireless Frequency Range
New search fields: The Wireless Frequency Range and the "Discard" fields have been added to the search options.
--------------------------------------------------------------------------------------------------------------------------
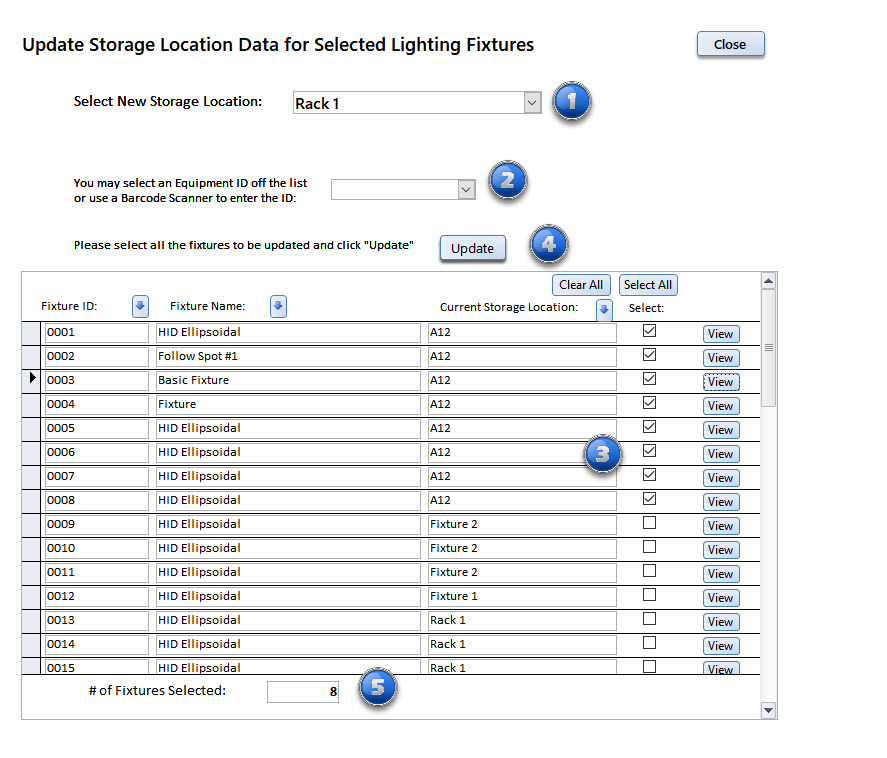
New Features for version 8-2
In version 8-2 three new Utilites have been added: Update Storage Location for ... Fixtures, Sound/MM Equipment and Tools. This Utility allows you to select one or more records and update the Storage Location to a new one.
Here is an example for the Lighting Inventory - Update Fixture Storage Locations.
#1) Select the new Storage Location from the drop-down box
#2) You may select the records to update by typing in the Fixture ID - or - use the drop-down box - or - scan the equipment label barcode.
#3) You may select the records to update by clicking in the check box for the record. Once a record is selected (by any method) you will see the check in the box.
#4) Click on the Update Button. The selected records will have the Storage Location changed and the check marks cleared.
#5) The count at the bottom of the screen will show how many records were selected before the Update.