Here are some frequently asked questions and their answers. Let us know if you have any ideas for new FAQ's.
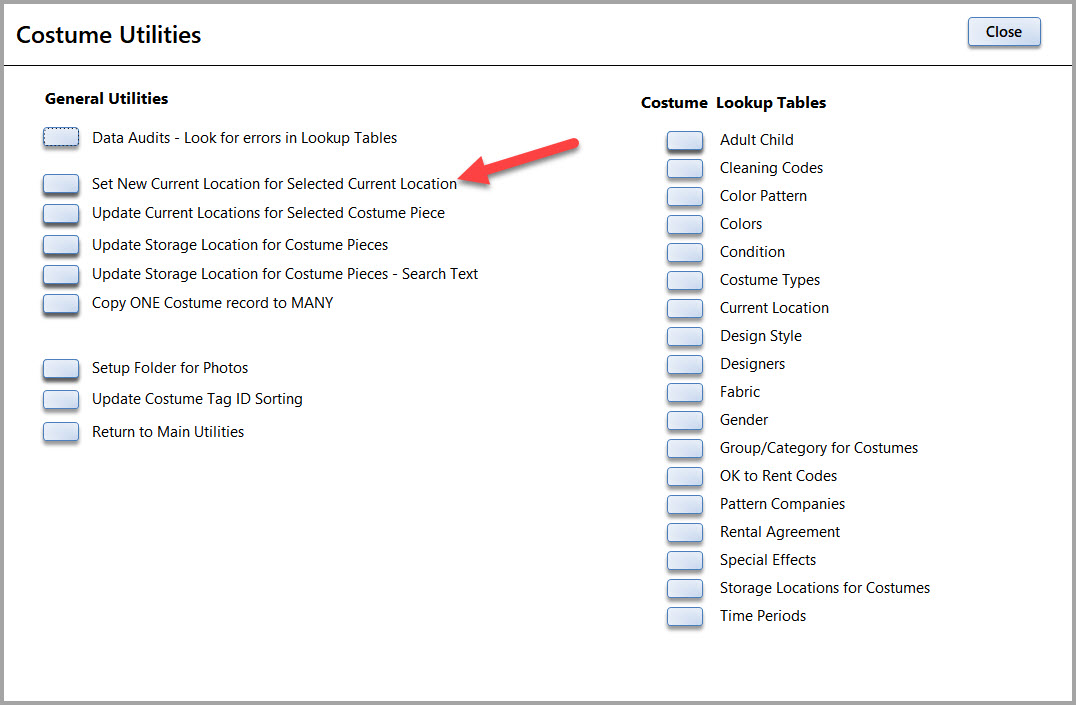
1) How do I update the "Current Location" for many costumes?
For example:
1) A lot of costumes that have been checked-in and have a Current Location of "Checked In" when I want them to say "Storage"
Or
2) A lot of costumes were used in a Production and need to be returned to Storage or sent out for Cleaning
There are 3 ways to update the Current Location field:
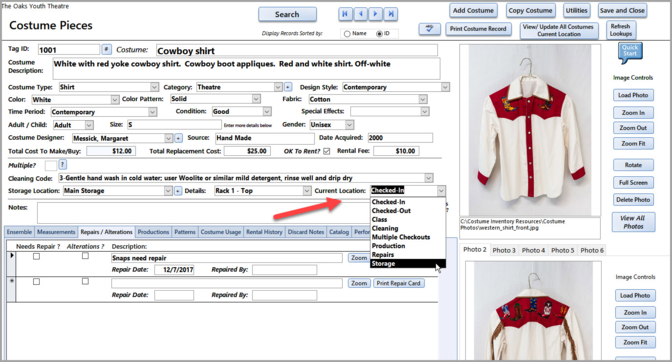
1) To update a single costume piece's location - go to the Costume Piece record and change the Current Location to the new location using the Drop-down choices.
Note: This will not allow you to change the Current Location to "Checked-out" or "Checked-In". Those changes have to be made on the Check-out screens. You can changed it from "Checked-in" to "Storage", "Cleaning" or "Repair".
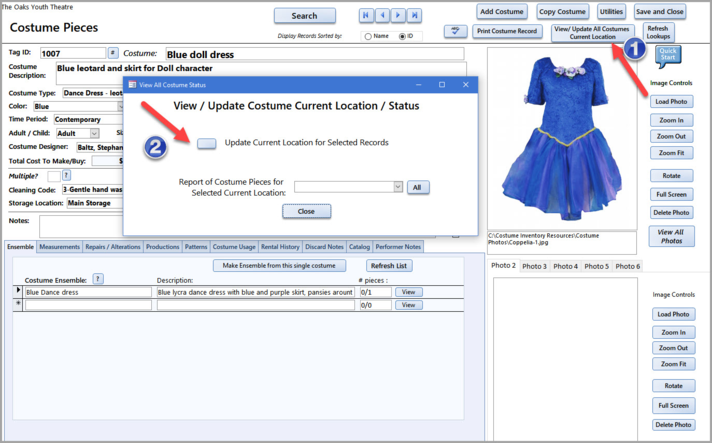
2) Update a group of Costume Pieces for the Current Location using the "View/Update All Costumes Current Location" button at the top of the Costume Pieces screen.
Click on the "Update Current Location for Selected Records" button. This will open the "Update Current Location / Status" form.
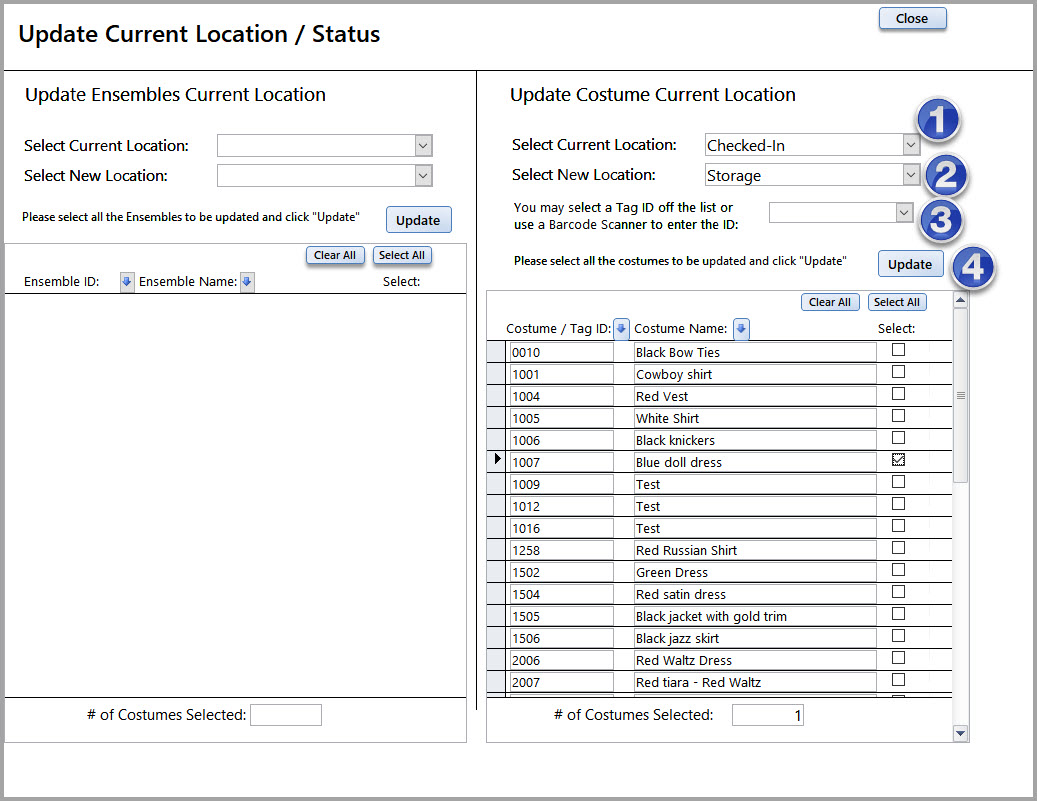
#1 - Select the "Current Location " that you want to change. In this example it is "Checked In"
#2 - Select the "Current Location" you want to change to. In this example it is "Storage"
#3 - You can select the records you want to change in 3 ways:
a) Enter, scan or select the Tag ID from the box with the "3" next to it.
- or -
b) Find the Tag ID/Name on the list and click the check box for those you want updated
- or -
c) Use the "Select All" button to select all records that have that Current Location value listed in box with the 1 next to it.
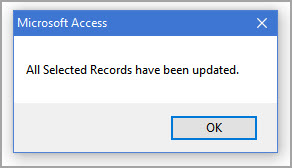
#4 Click the "Update" button to make the change. Once done you will see a message box telling you that they have been updated.
** Note - you can also get to this form from the Costume Piece Utilities form
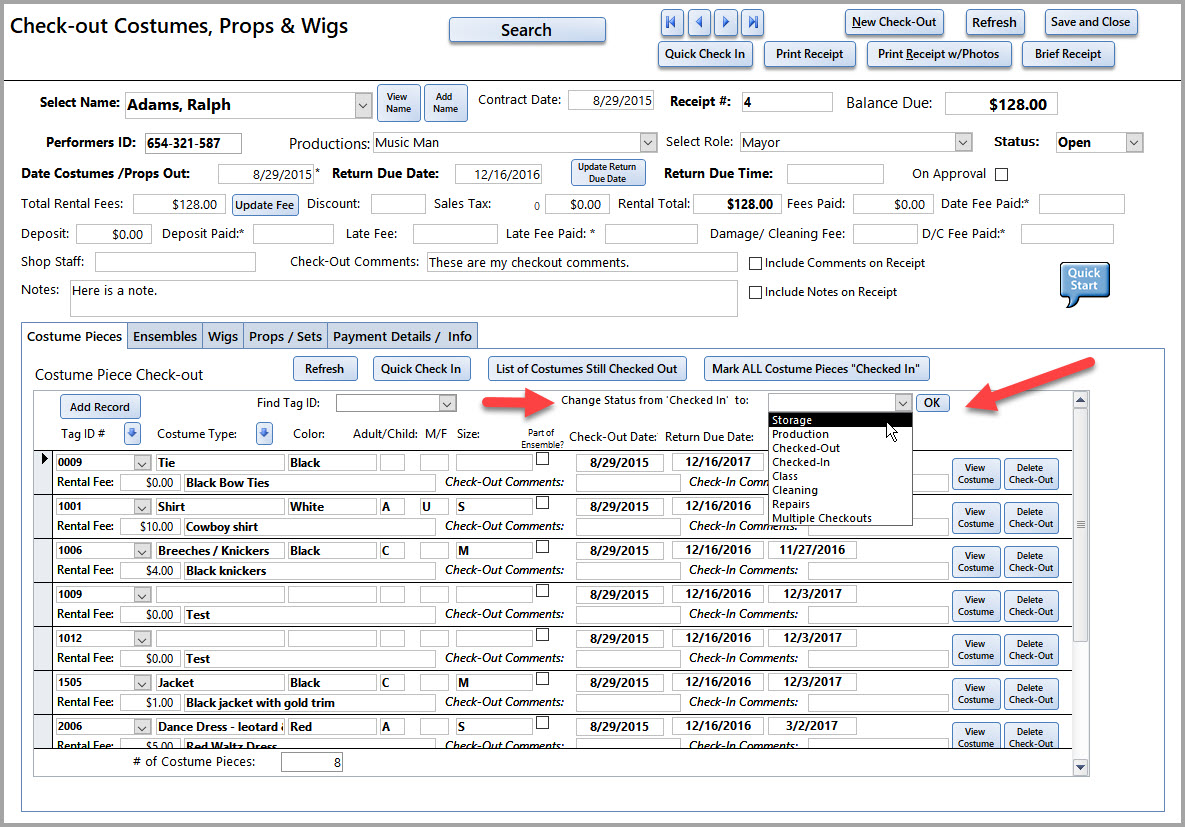
3) For Check-out records you can update the Current Location from the Check-out screen. You can select the Status and press "OK". This will update all the Costume Pieces in this Check-out record.
Note - You can also update the Current Location for all Props and Wigs checked out on their Checkout screens.
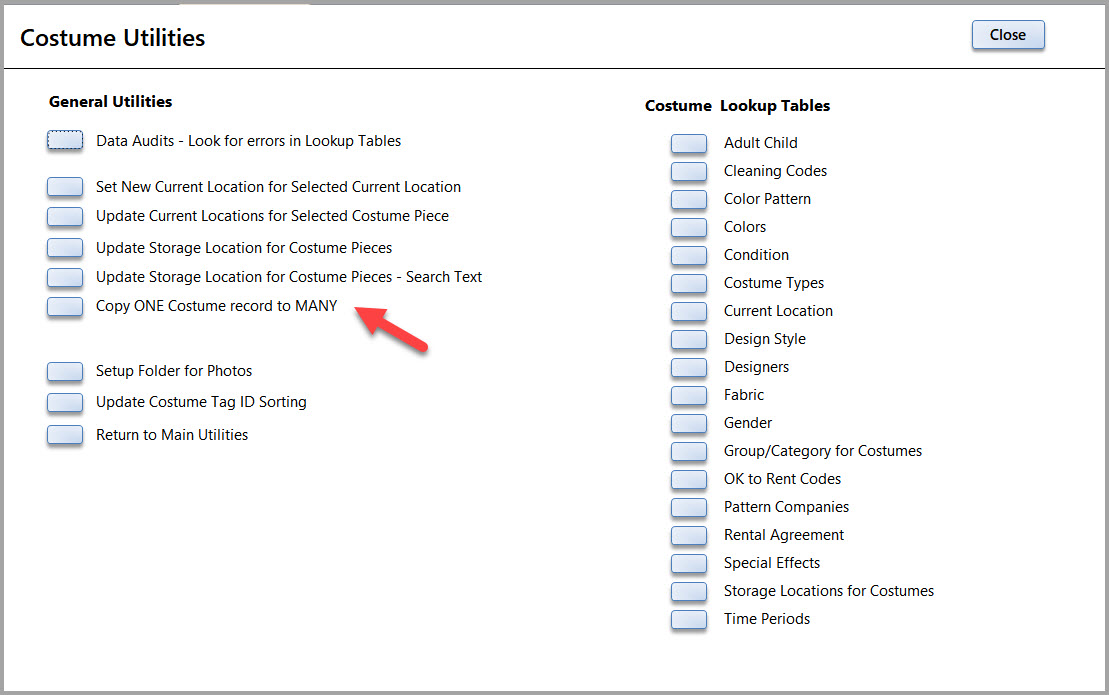
2) How can I update several records with data from one record?
Have you ever created a record, then copied it several times only to realize that you didn't include enough information on the first record - so now you have a lot of records to edit? The "Copy One Record to Many" function will help you copy the data from the complete record to many other records.
a) Go to the Costume Utilities menu and select "Copy ONE Costume Record to MANY"
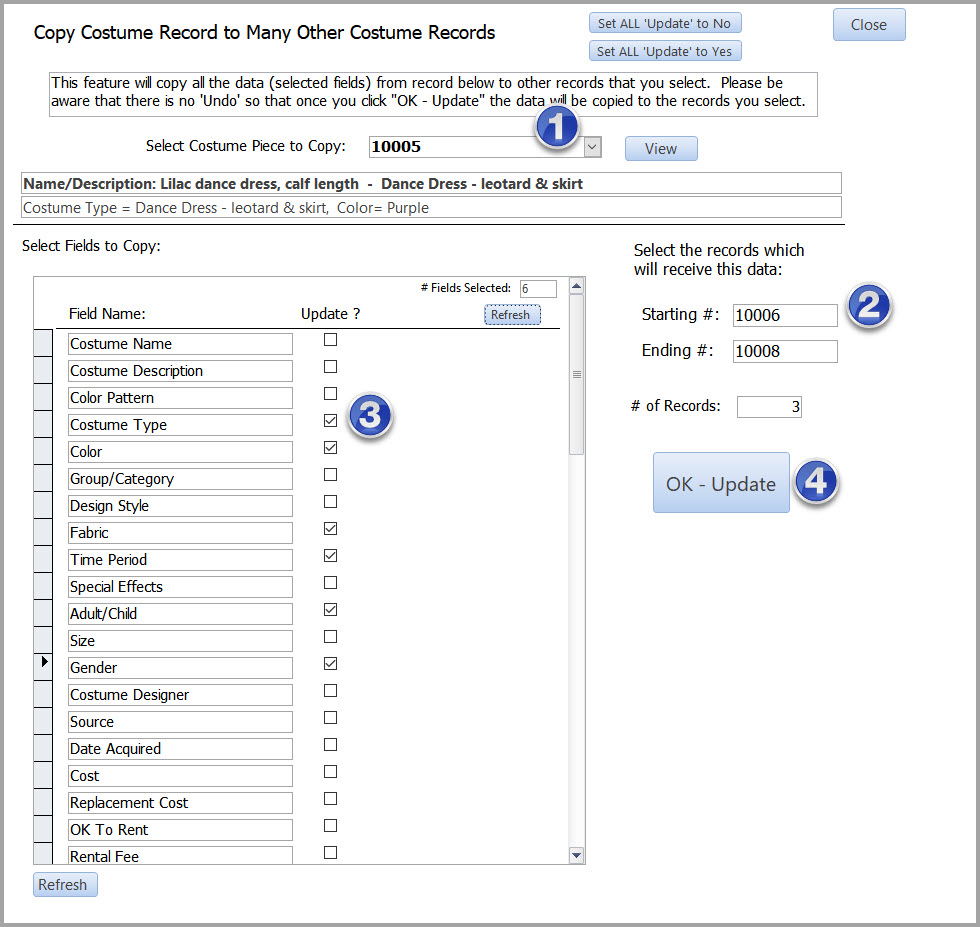
b) There are several steps here:
1) Select the piece with the good data. You will see the name, description, costume type and color listed below.
2) Enter in the Starting Number of the records you want the data to go to. Enter the Ending Number - the records must be consecutive to be updated.
3) Select the fields that you want copied to the selected records.
4) Click "Ok - Update". You will be asked to confirm the update as there is no "undo".
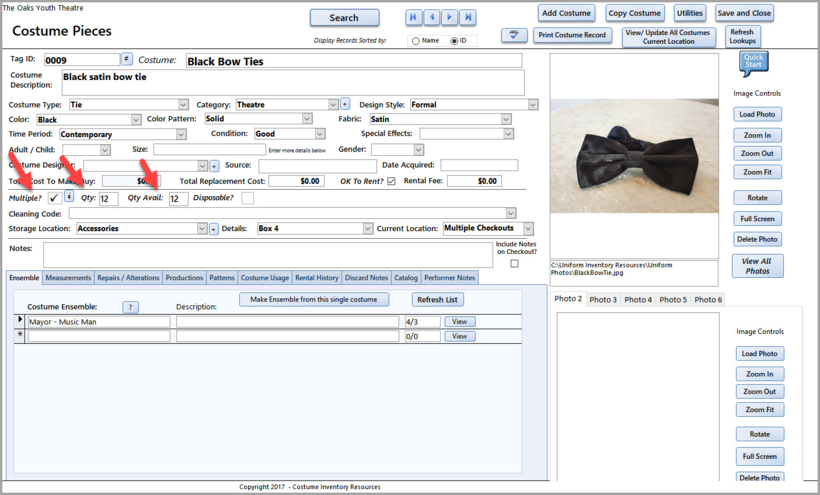
3) I have a box of Belts (ties, t-shirts, hair accessories, gloves, etc) that I want to check out but I don't want to put an inventory tag on each one. Can each one have the same Tag ID?
The Costume Pieces form now has the option to mark an Costume Piece as having multiple pieces with the same Tag ID.
New Fields:
Multiple: Yes/No
Qty : Enter the number you have in stock
Qty Available: The number of pieces that are not checked out and are available
Disposable: Yes / No (see below)
Most items in the Costume Inventory are quite valuable and have an individual inventory tag ID. But some items like ties or gloves or other small items are not worth tagging individually but are still checked out to students/performers and need to be tracked.
For those items that are inventoried and may be tagged (but also may not tagged), there is the option to classify them as a “Multiple”. All items, for example a box of ties, will have the same ID number assigned.
On the Costume Inventory screen there is a field called “Multiple ? “ with a  (check box symbol). If the Multiples box is checked then you can enter a quantity, “Qty” amount. If there are 45 ties in the box, then the Qty would be 45. The “Qty Available” field is calculated based on the original quantity entered minus the number of ties that are checked out.
As the ties are checked back in the “Qty Avail” is increased.
4) I give each performer a box of false eyelashes at the beginning of the performance. Can I track those?
Yes - now a costume piece can be marked as "Disposable". On the Costume Pieces form - next to the Multiples field is a field for Disposable.
Some items are purchased by the school/theatre to be distributed with the costume but are not expected to be returned. This may include gloves, socks, leotards, boxes of false eyelashes, etc. These items are considered ‘Disposable’. You may have 50 pairs of gloves at the beginning of the season. You check out 45 pairs to your students and you will have only 5 pair remaining. The Quantity field starts out at 50 but as each pair of gloves (or other costume piece) is checked out the Quantity is decreased by one.
On the Checkout screen for the student who checks out the disposable item, the Check-in Date is filled in automatically when the item is checked out so you don’t have to worry about it when the rest of the order is checked back in.
To mark an item as Disposable - it must first be marked as "Multiple" - then you can put a  in the "Disposable" box.
5) I am getting rid of a few hundred costumes - how can I mark them all as discarded easily?
If you are clearing out a large section of your collection and want to mark them as Discarded - you can do that from this dialog (see the Costume Piece Utilities Menu).
a. Select the Costume Pieces to Discard (you can mark the check box or put your cursor in the Tag ID drop down box and scan your tags with the barcode scanner).
b. Enter the Reason and value.
c. Click on the "Update" button to mark them all.