New Features Version 7 & 8
Version 8-12 - Released December 2018
Checkout-Rentals:
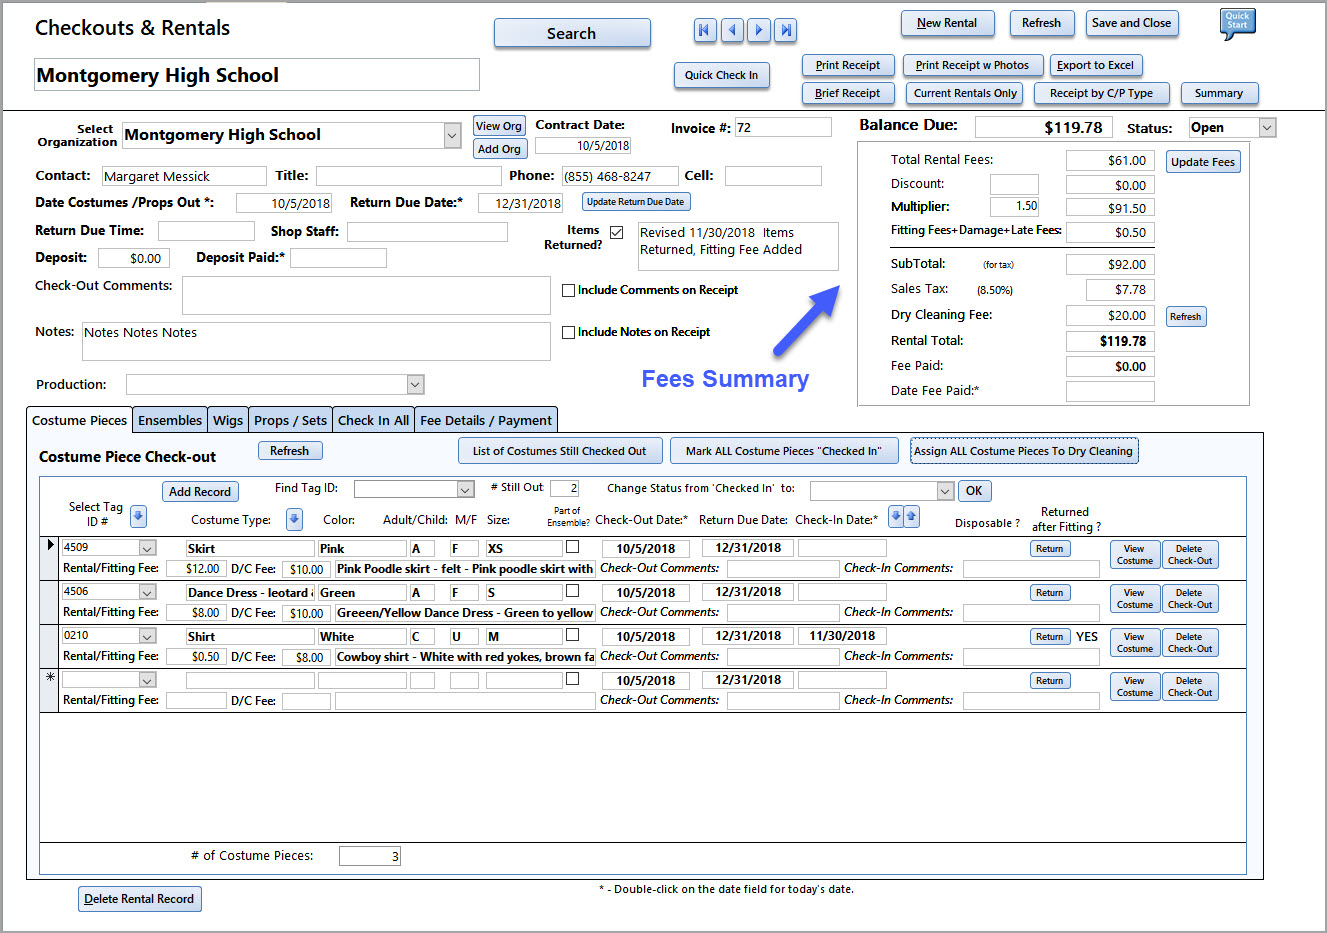
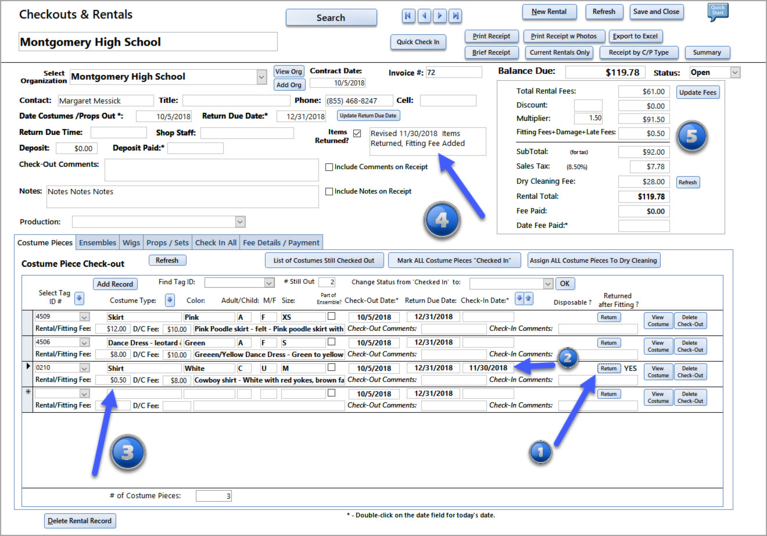
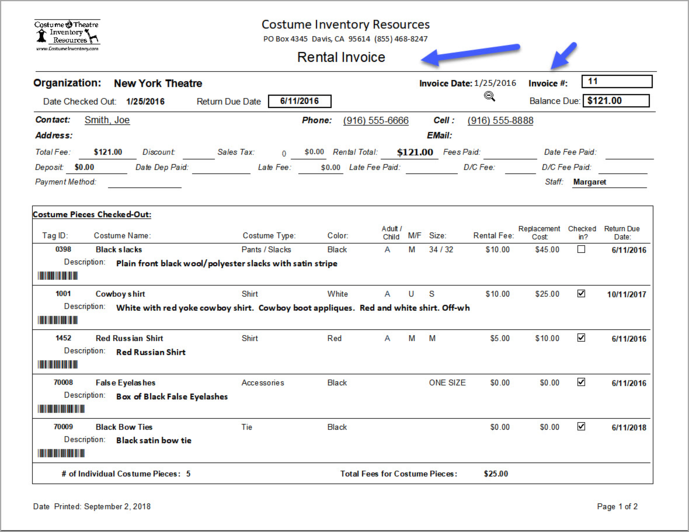
1) The Checkout and Rentals pages and reports have been re-designed. There were so many fees and adjustments for any checkout or rental that it was getting hard to find them on the screen and receipts.
* The Balance Due is at the top which takes into account the fees plus the amount paid.
* The Total Rental Fees are for all Costumes, Props, Wigs, and Ensembles.
* The Discount can be applied to the Rental Fees. This is a percent so to take 50% off, enter 50.
* The Multiplier is for very long rentals. If your normal rental fee is designed for 2 weeks but someone wants to rent items for 3 weeks you could enter a 'multiplier' of 1.5 (see below).
* The Fitting Fees + Damage + Late Fees - is a sum of all three fees. You can see the details on the Fee Details / Payment tab.
* The Subtotal is the sum of the Rental Fees (and Multiplier if used) minus the Discount amount + all extra fees.
* Sales tax is calculated if: Your organization has to charge Sales Tax AND this Organization's record is marked to be charged Sales Tax.
* If the Costumes have a Dry Cleaning Fee - it is added next.
* The Rental Total is shown with all Rentals, Fees, Sales Tax and Dry Cleaning Fees.
* The Fee Paid is the amount paid by the customer
* The Date Fee Paid is the date when the payment was received. Note: If the customer pays in more than one payment, all payment amounts should be summed in the this one field. If you need to keep track of the different payments, enter it in the Notes field.
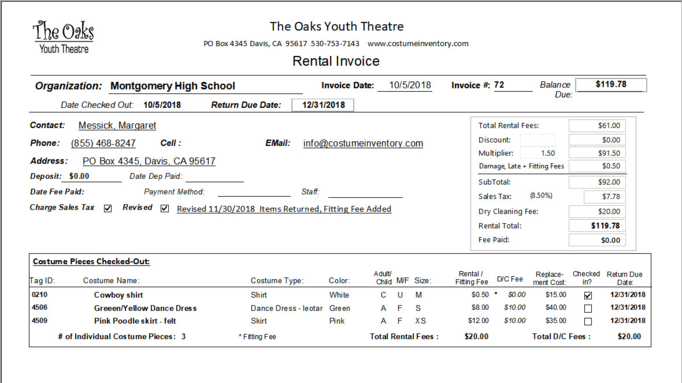
All the Receipts have been updated to show this Fees Summary.
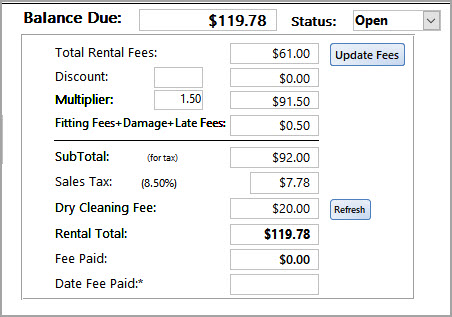
2) For Rentals (to other Organizations) you can now assign a Fitting Fee (either an exact amount or a percentage of the rental fee) when an item has been returned early. (This feature is not on the Individual Checkout screen.)
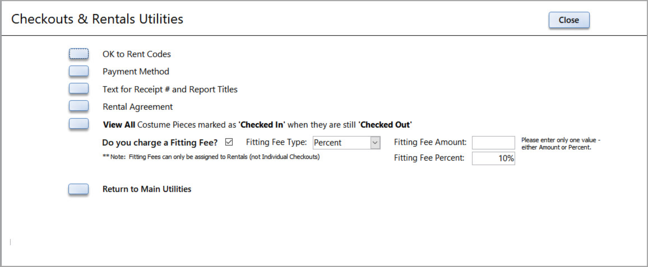
To set up the Fitting Fee - go to the Rental Menu / Utilities:
To turn on the Fitting Fee feature - check the box next to "Do you charge a Fitting Fee?". Select the Fitting Fee type (Percent or Amount). Enter in the fee (either the amount or the percent).
On the Rentals screen you will see a new button called "Return". When an item is returned, click on the Return button and 5 things happen:
1) Next to the Return button the word "YES" appears to show that it was returned.
2) The Item is 'checked in'.
3) The Rental Fee (on the Costume listing) is updated to the Fitting Fee
4) A note is added to say that some items were returned.
5) The Total Rental Fees is adjusted to reflect just the items checked out (not returned). The Fitting Fee is added in the "Fitting Fees+Damage+Late Fees" section. Note: on this example there are Props checked out as well. To see the Fees breakdown look at the Fee Details/Payment tab (below).
To see the Fitting Fees you can look at the top Fees summary or the tab for 'Fee Details / Payment'.
Props/Sets:
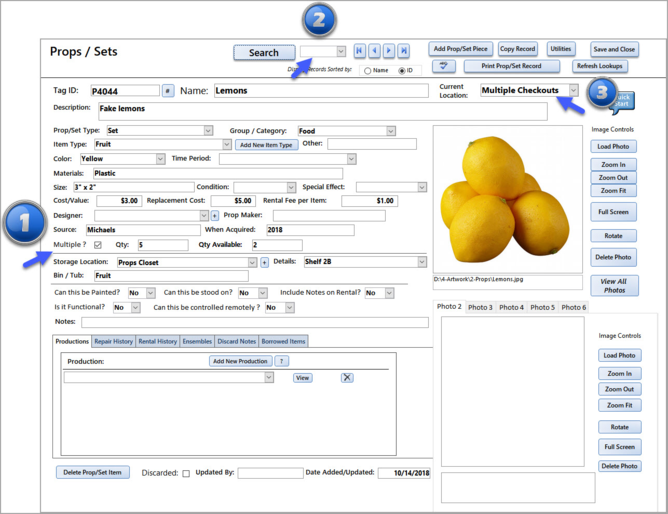
1. The Quantity field is back along with the option to mark a Prop as a "Multiple" and enter the Quantity field. After any rentals the 'Qty Available' field will be updated.
2. You may search for the Prop/Set piece by ID from the top of the screen without having to go to the Search dialog.
3. The Current Location field is moved to the top of the photos to make it easier to find when trying to figure out where an item is.
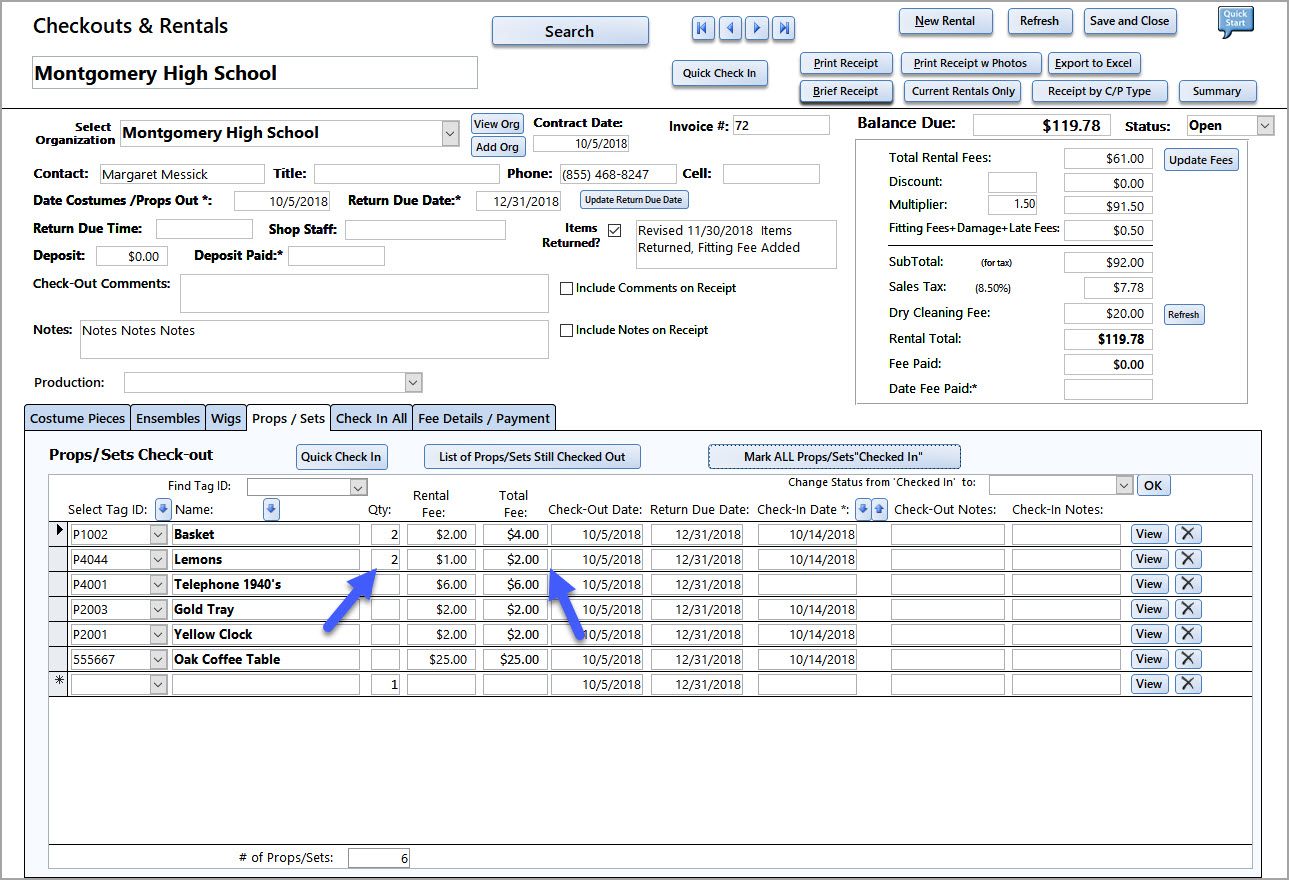
Props Rentals: The Qty Rented field has been added so that if a customer checks out 2 Lemons (see below) - the Total Fee is calculated as the Qty Rented * the Rental Fee. In this case for the Lemons, the Qty Rented = 2 and the Rental Fee is $1 so the total is $2.00
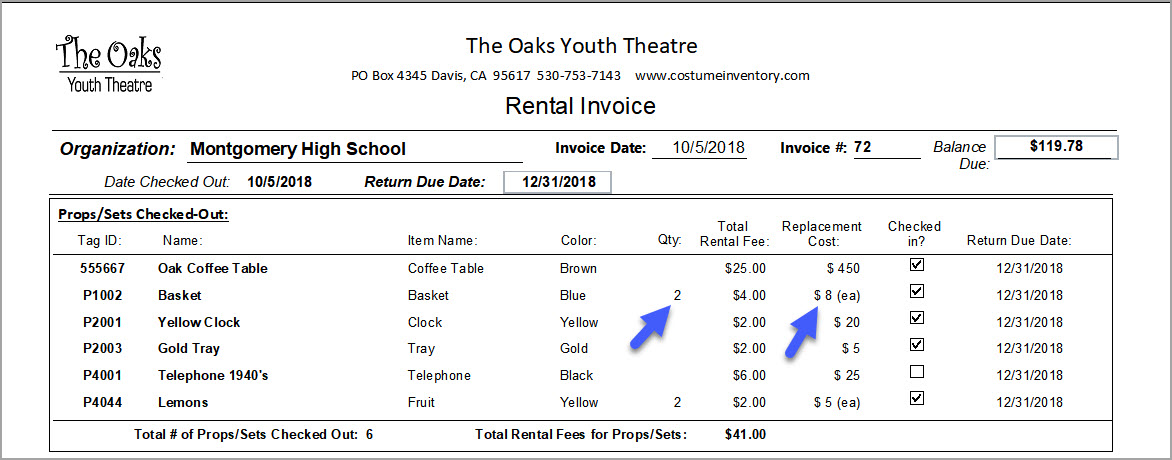
On the Rental Receipt the Qty Rented is shown with the Total Rental Fee and the Replacement Cost per item.
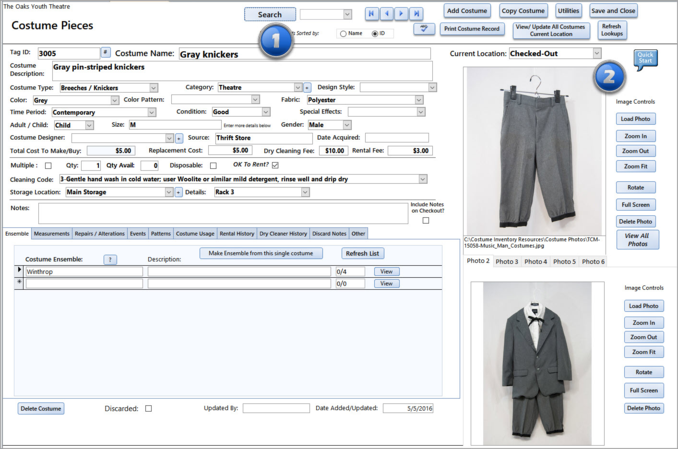
Costume Pieces:
1. You may search for the Costume Piece by ID from the top of the screen without having to go to the Search dialog.
2. The Current Location field is moved to the top of the photos to make it easier to find when trying to figure out where an item is.
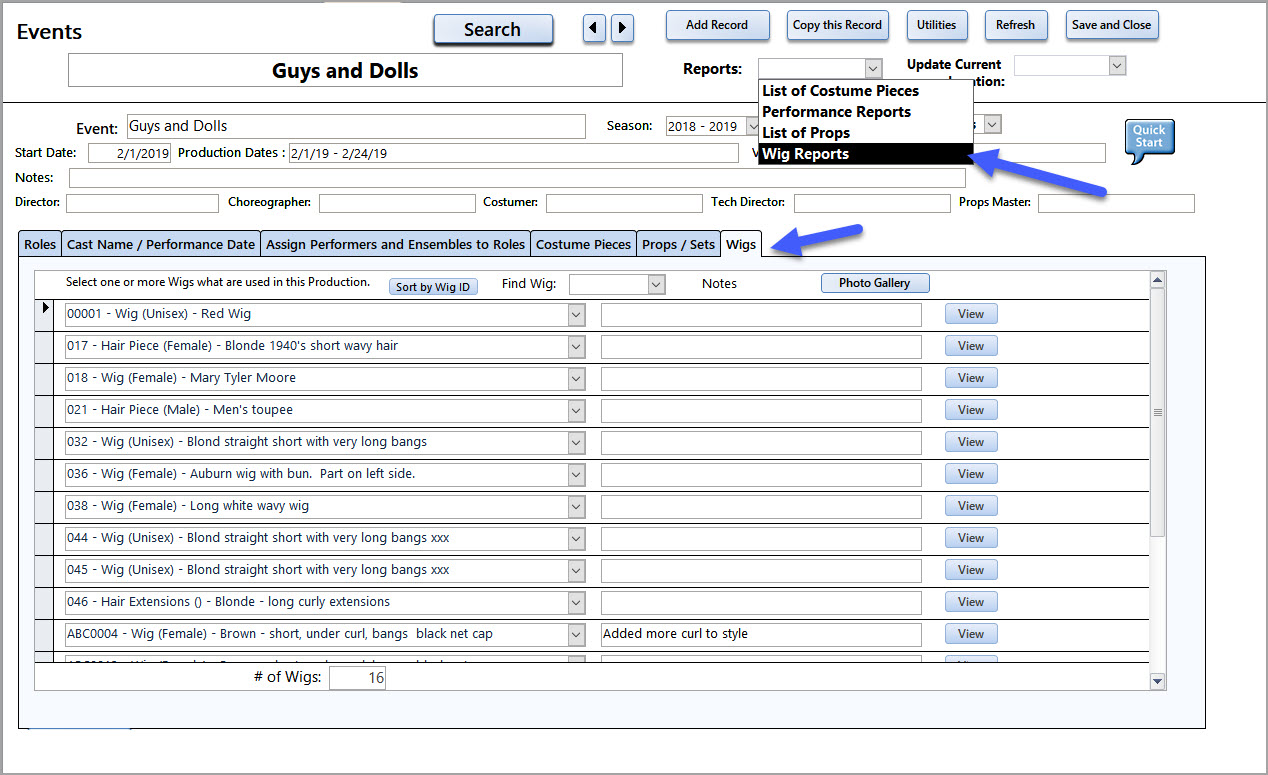
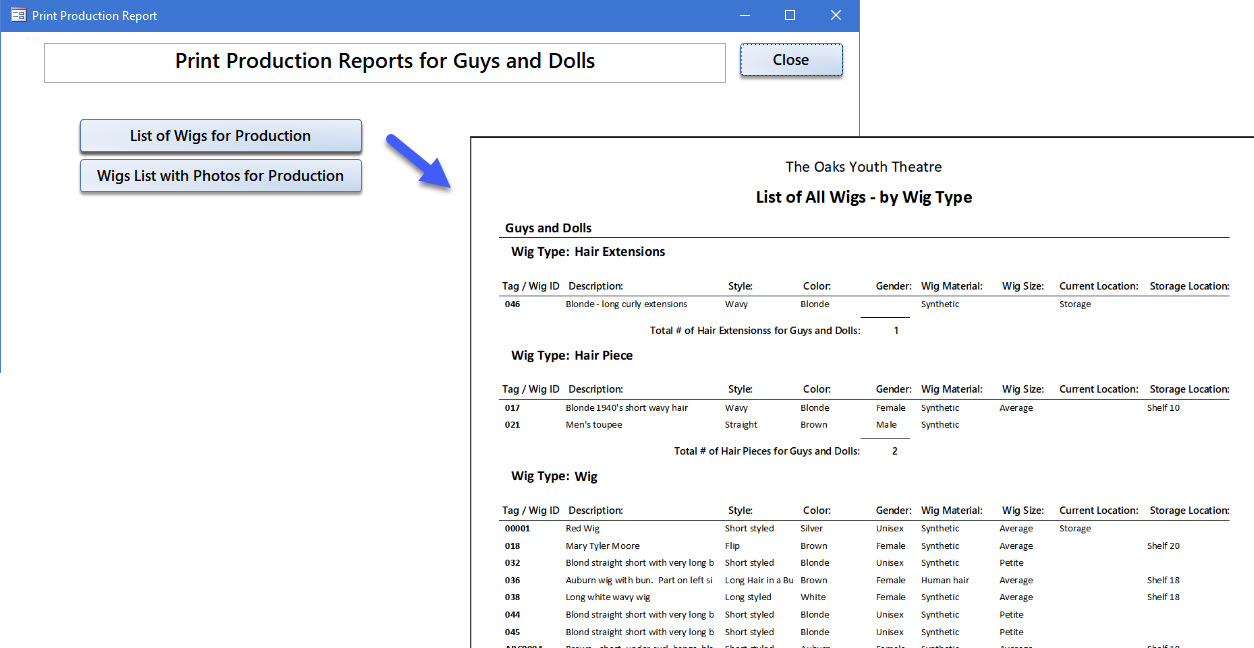
Wigs
Wigs can now be assigned to one or more Productions.
On the Productions screen you can see the Wigs that are assigned and print a report.
Version 8-10 - Released October 2018
Costume Pieces
Costume Pieces
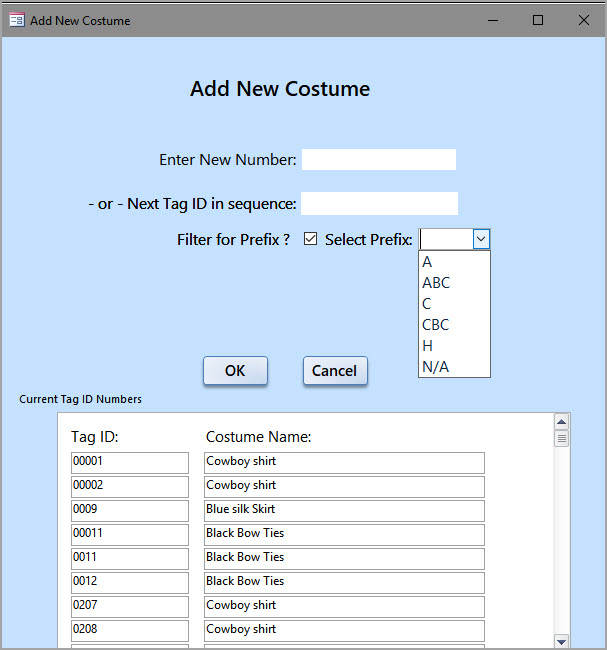
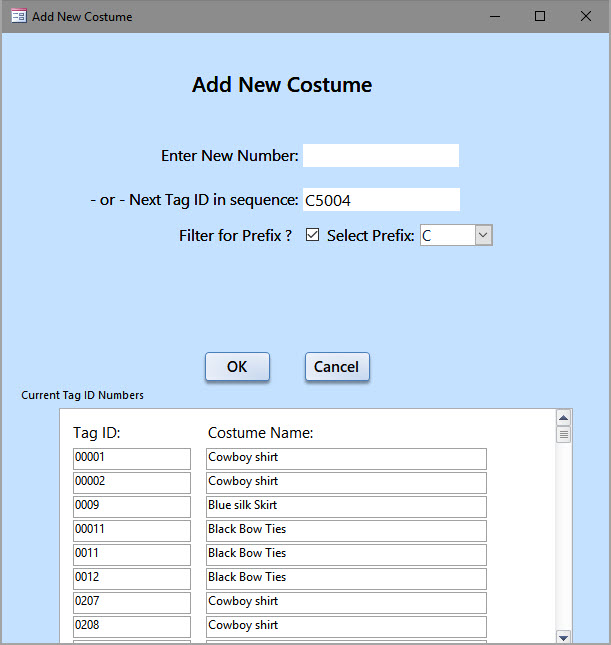
1) Add / Copy record with Filter Prefix. Many customers have Tag ID / records with different prefixes (i.e. A0001 for Accessories, H001 for Hats, S001 for shoes, etc.) Now when you add or copy a record you can find the last value for a selected Prefix. The 'Filter for Prefix' is available on both the Add and Copy functions.
In this example - there are costumes that start with A, ABC, C, CBC, etc. For Tag ID's that have no prefix - select the "N/A".
With "C" selected I will have the option to select the next number in sequence, "C5004" or enter a new number.
2) Dry Cleaning Reports
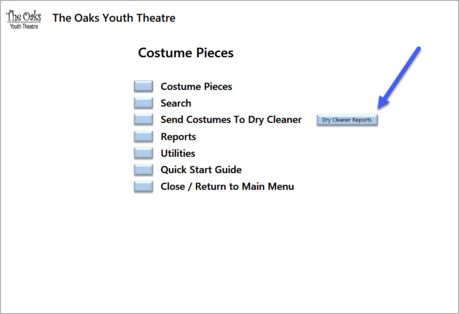
In the previous version we introduced the new field, Dry Cleaning fee. See the notes for version 8-9. Now you can print summary reports of all items sent to Dry Cleaning. Select the "Dry Cleaner Reports" button.
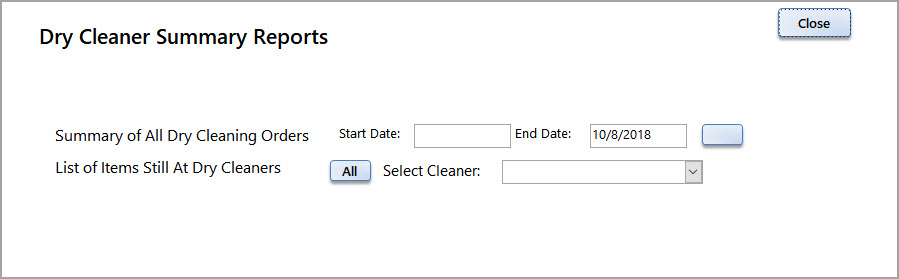
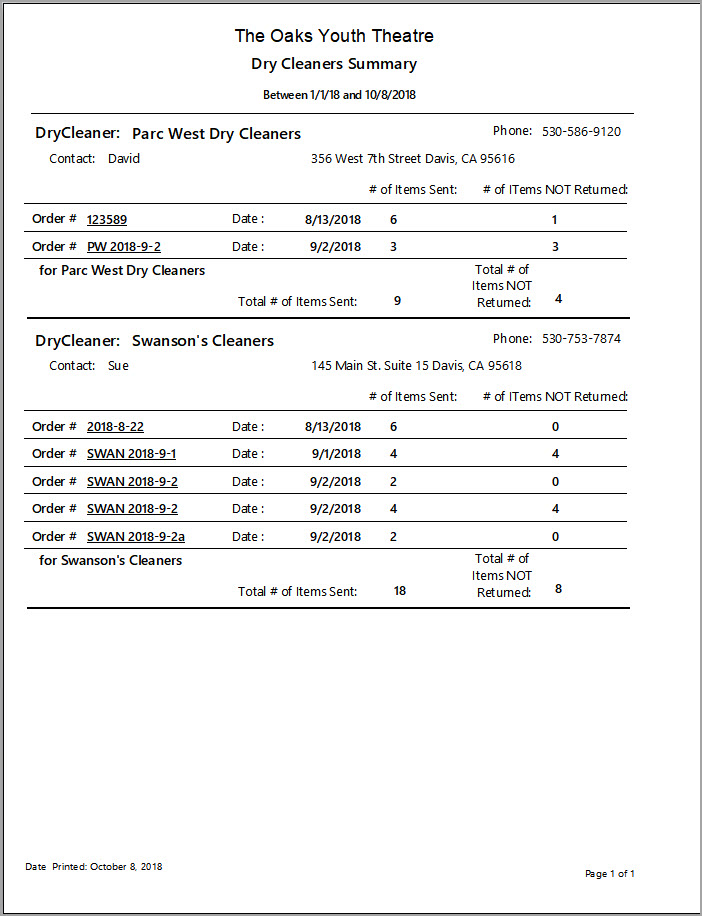
Summary of all Dry Cleaning Orders between 2 dates:
List of all Items Still at Dry Cleaners. This report can be printed for all Dry Cleaners you have in the database or you can select one. In the example below I have selected just one cleaner - Swanson's Cleaners.
3) Advanced Search
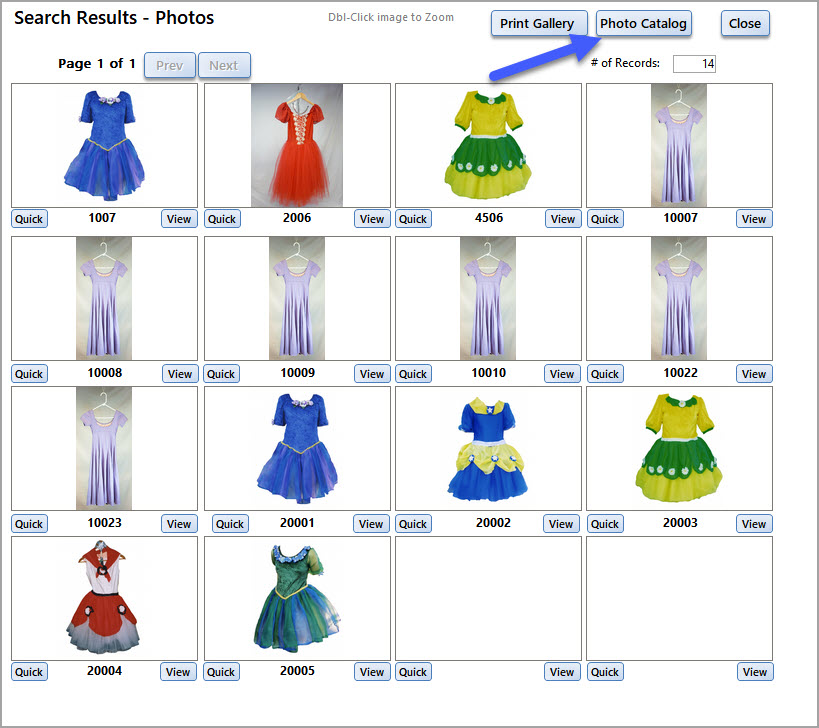
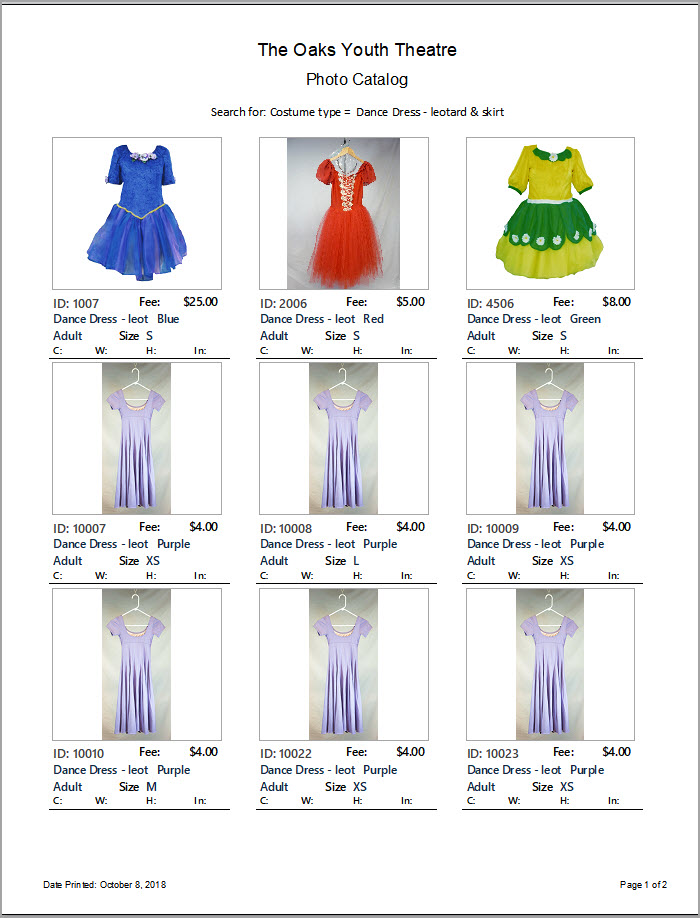
a. New Photo Gallery Catalog. On the Photo Gallery screen there is a new option to print a Catalog with the photos and the Tag ID, Rental Fee, Costume Name, Type, Size and Chest, Waist, Hips and Inseam Measurements.
Like all reports - this report can be printed to a printer or a PDF file. The PDF can be emailed or posted to your website.
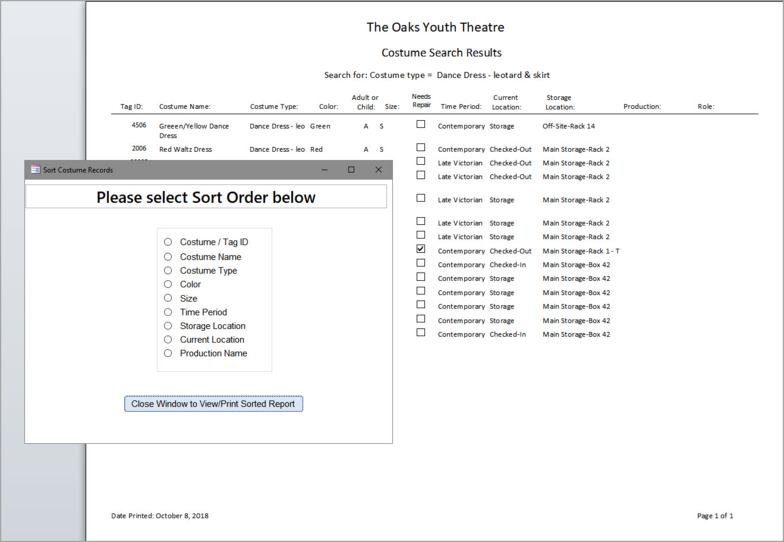
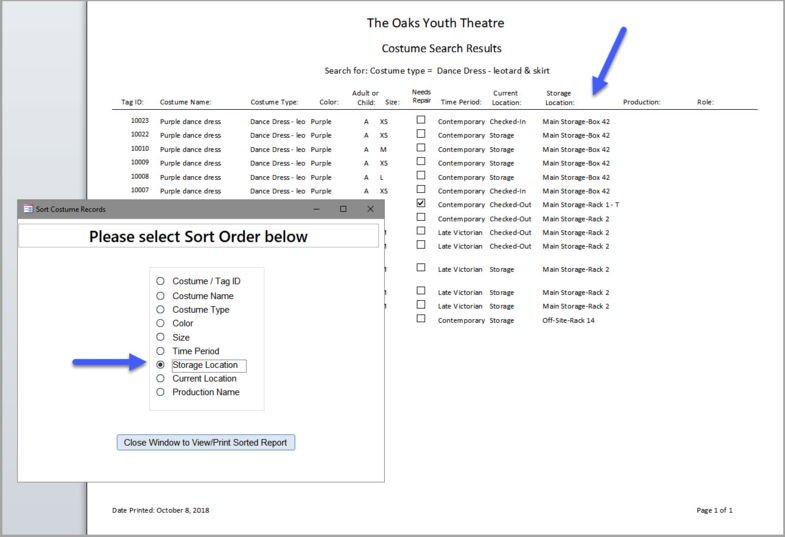
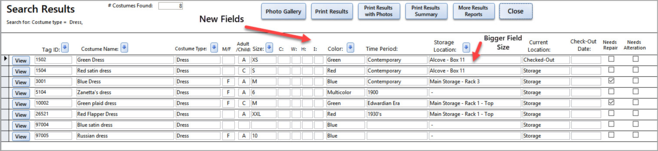
b. Print Results report can be sorted before printing.
When the "Print Results" button is selected the report opens along with a popup that will allow you to select a field to sort the results.
In this example I selected 'Storage Location' and the resulting report is sorted on that field.
Props / Sets
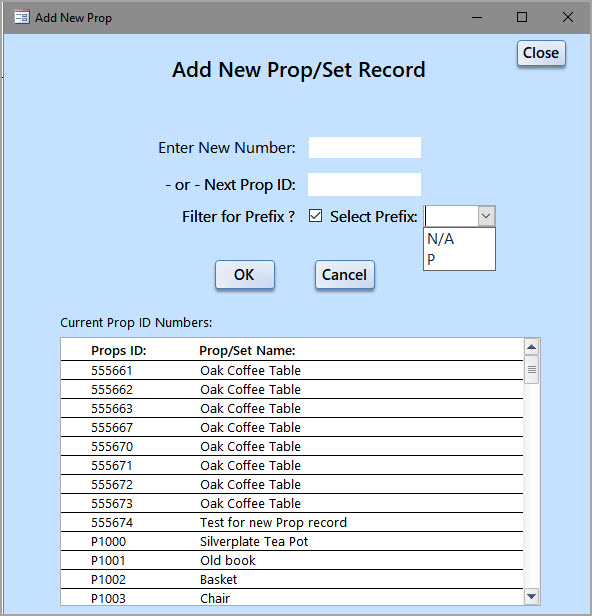
1) Add / Copy Props/Sets with filter for Prefix. Many customers have TagID / records with different prefixes (i.e. P0001 for Props, R001 for Rugs, etc.) Now when you add or copy a record you can find the last value for a selected Prefix.
In this example you can select "P" for the records with the "P" prefix or "N/A" for those records without a prefix. You have the option to select the next number in sequence or enter your own number. The 'Filter for Prefix' is available on both the Add and Copy functions.
2) Advanced Search
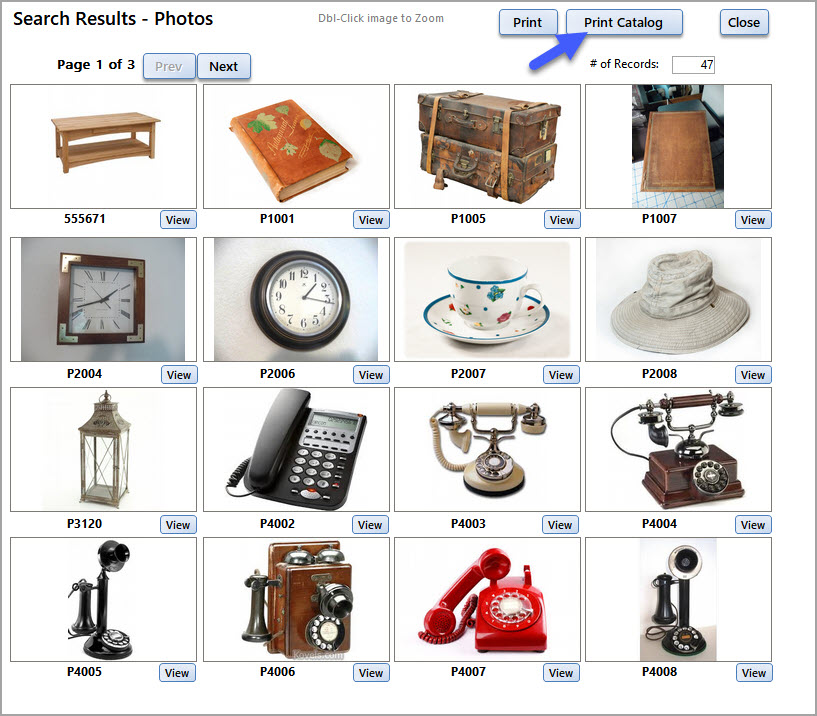
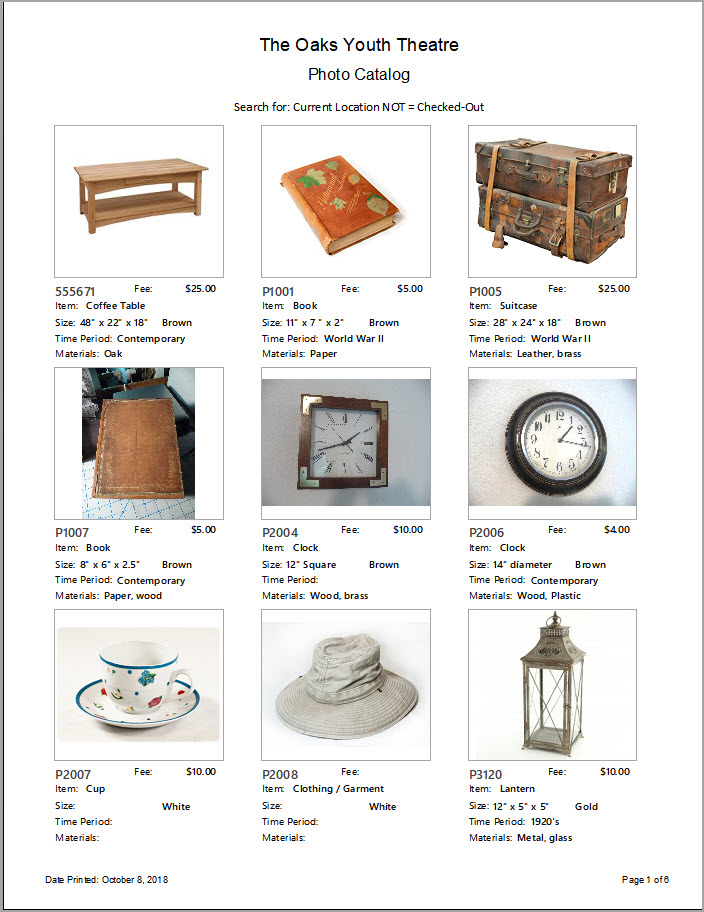
a) The Props Photo Gallery form has a Props Catalog feature to print the photos and a few descriptive fields.
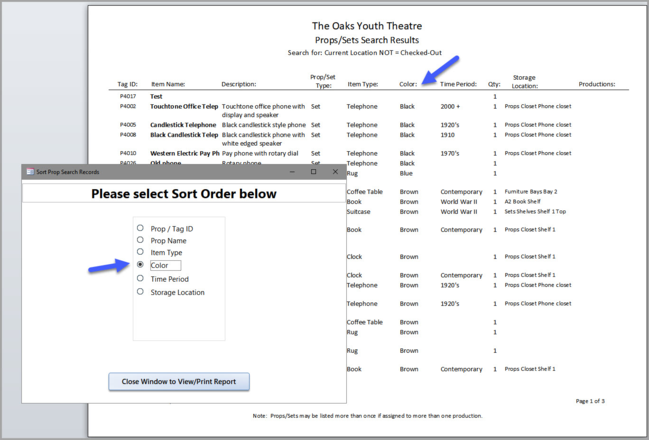
2. Print Results Report can be sorted. The Pop-up gives you several fields to sort on. In this case I picked the Color field.
Version 8-9 - Released September 2018
Costume Pieces
Costume Pieces Form
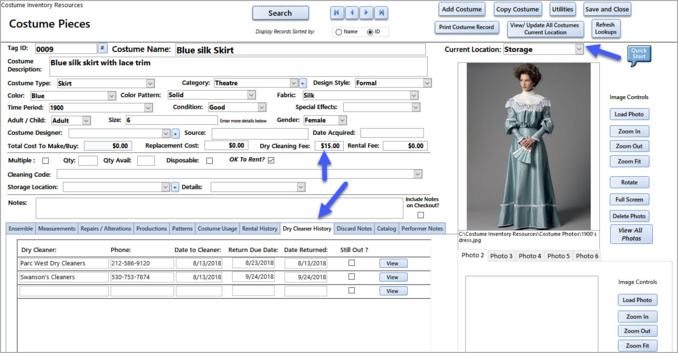
1) The Current Location Field has been moved to the top right corner - above the photo - to make it easier to find. (See below)
2) ** New ** A new field for Dry Cleaner Fee has been added to each Costume Piece Record
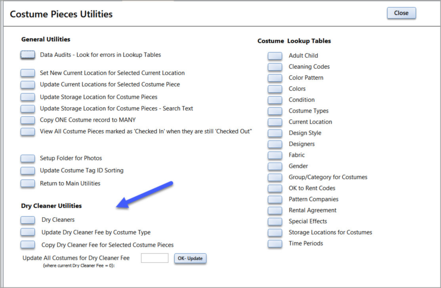
There are 4 ways to update the Dry Cleaner Fee: **** Please make a BACKUP of your database before doing this. Go to Utilities / Make A Backup
a. On the individual Costume Piece record - enter the fee in the Dry Cleaning Fee (next to Rental Fee).
b) On the Costume Piece Utilities form :
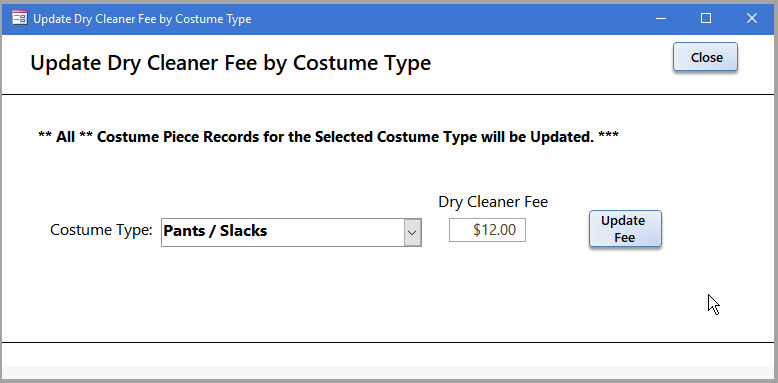
1) Update the Dry Cleaner Fee by Costume Type - you select the Costume type and the fee. Click on the Update button.
2) Copy Dry Cleaner Fee to Selected Costume Pieces - use the Copy One Costume Record to May option.
1) Select the Costume Piece with the correct Dry Cleaner Fee
2) Select a range of other costume pieces ID's to update - they must be in sequential numbers
3) Look for the "Dry Cleaner Fee" field name on the list of fields.
4) Click on the Update button.
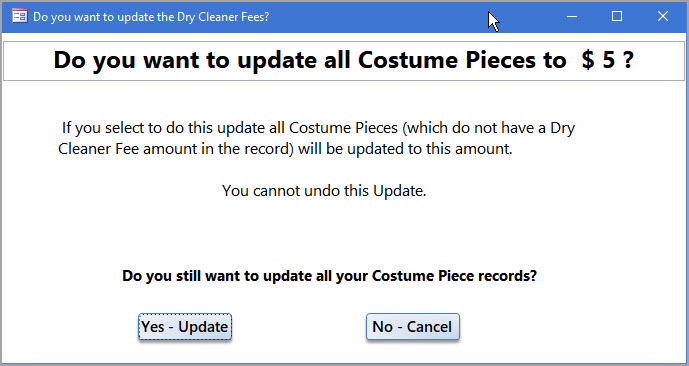
3) You can also update all the Costume Pieces that don't have a Dry Cleaner Fee with a fee. This will only update records that don't have a Dry Cleaner Fee yet.
3) There is a new tab on the Costume Piece form to see the Dry Cleaner History (see screen print above).
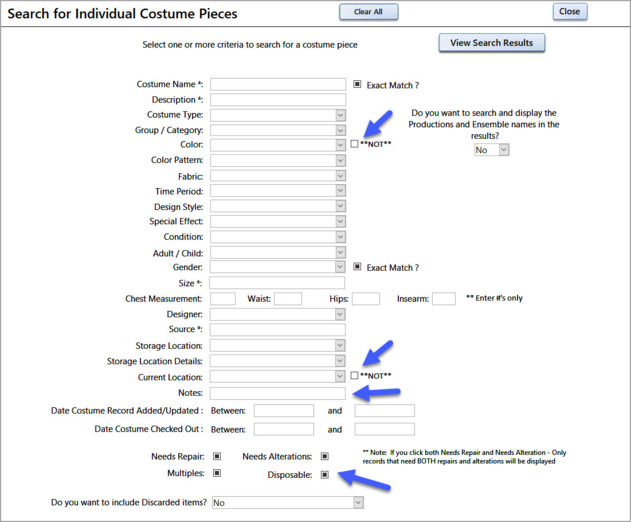
Search
The Advanced Search form has several New fields:
You can now search on the "Notes", Multiples, and Disposable fields.
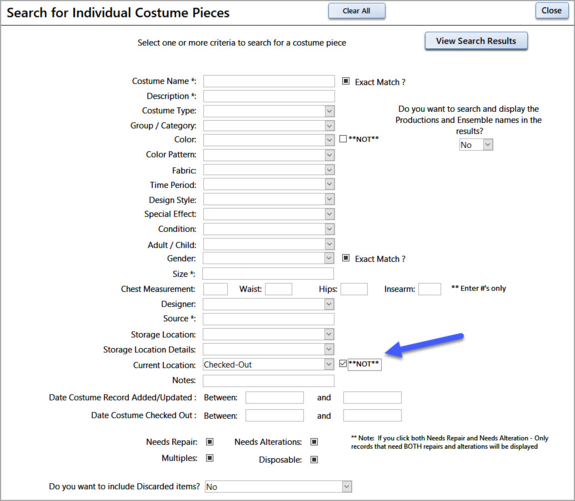
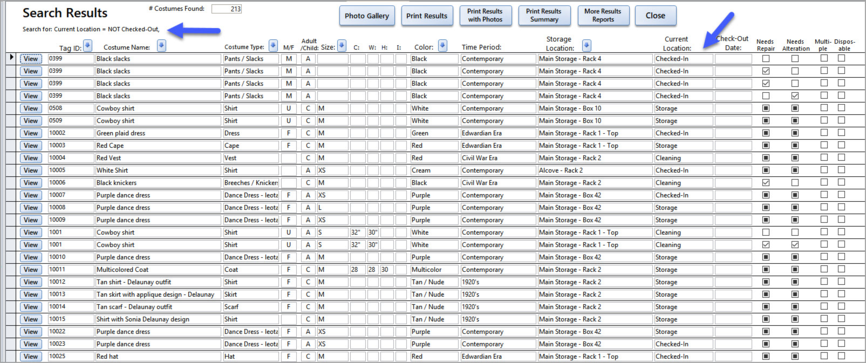
You can also filter the search using the "Not" condition on the Current Location, Time Period and the Color. For example: You want to find everything that "NOT Checked Out". You can select the Current Location of "Checked Out" and then check the box for "NOT" - see below.
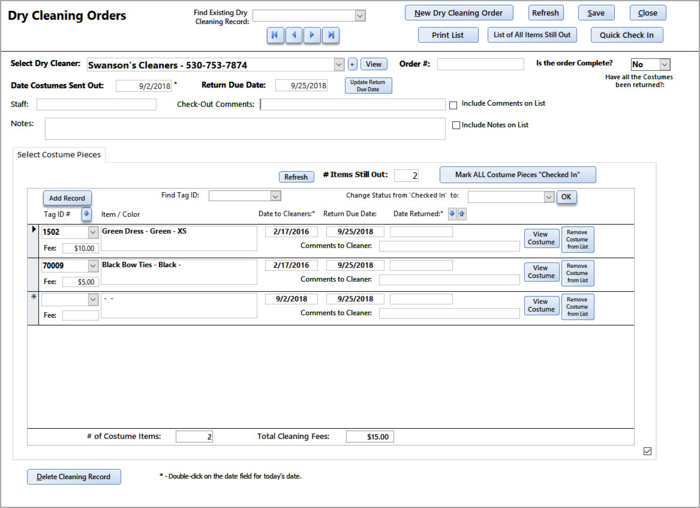
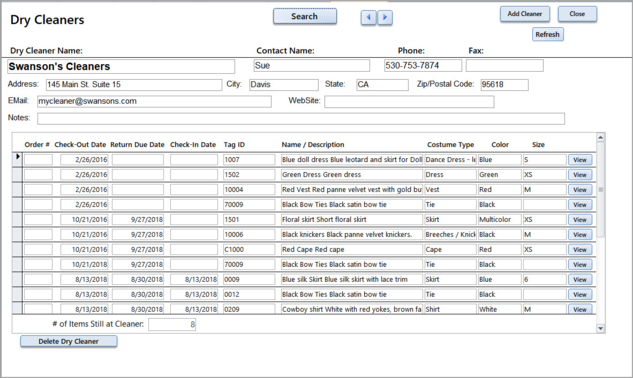
** New ** Send Costumes to Dry Cleaner You can send multiple costume pieces to the cleaner very much like you rent costume pieces to other organizations.
1) You create a Dry Cleaner Record - from the Costume Pieces Utilities
2) On the "Send Costumes to Dry Cleaner" form you select the Dry Cleaner, the Date they are due back and then add your costume pieces.
3) You can print a list of everything that has been sent to the cleaner using the "Print List" button. If some items come back sooner, you can print a "List of All Items Still Out" as well.
4) When a costume piece is added to the Dry Cleaning Orders form the Current Location is changed to "Cleaning". When the costume piece is checked back in the Current Location is changed to Storage.
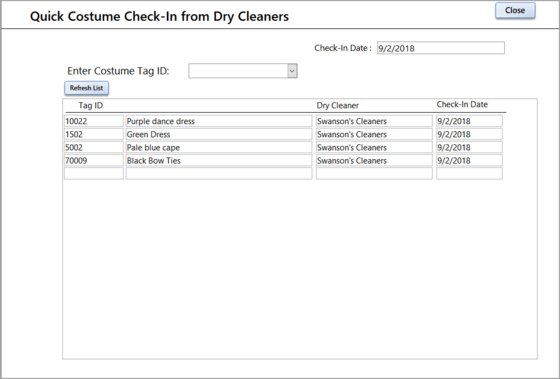
5) You can check in costumes the same ways as you do in the Checkout / Rental screen:
a) Double Click on the "Date Returned" field
b) Pick a Day off the calendar to the right of the "Date Returned" field.
c) Use the "Quick Check-in" form
d) Use the "Mark All Costume Pieces Checked In" button.
6) You may transfer all the Checked In costume pieces from a Checkout/Rental record to the Dry Cleaner record. See the Checkout/Rental section below.
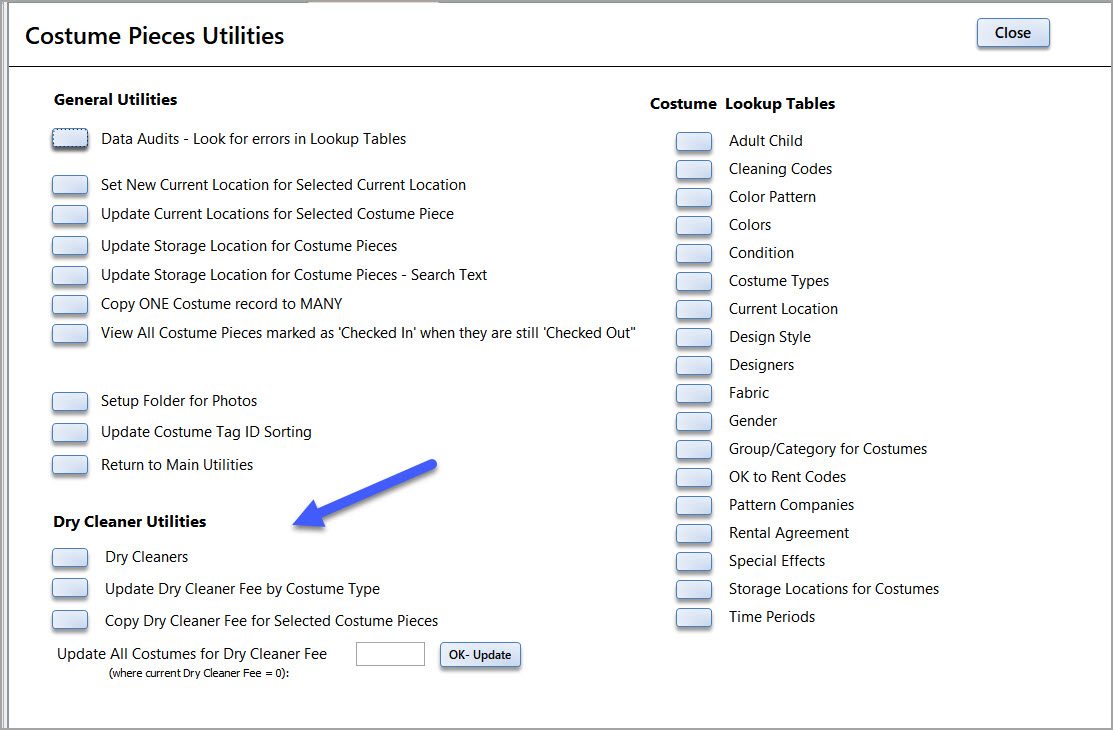
Utilities: The Utilities form has been updated to include the Dry Cleaner utilities:
Dry Cleaners - Create list of Cleaners. View all Costumes sent to the Cleaner.
Props
Search
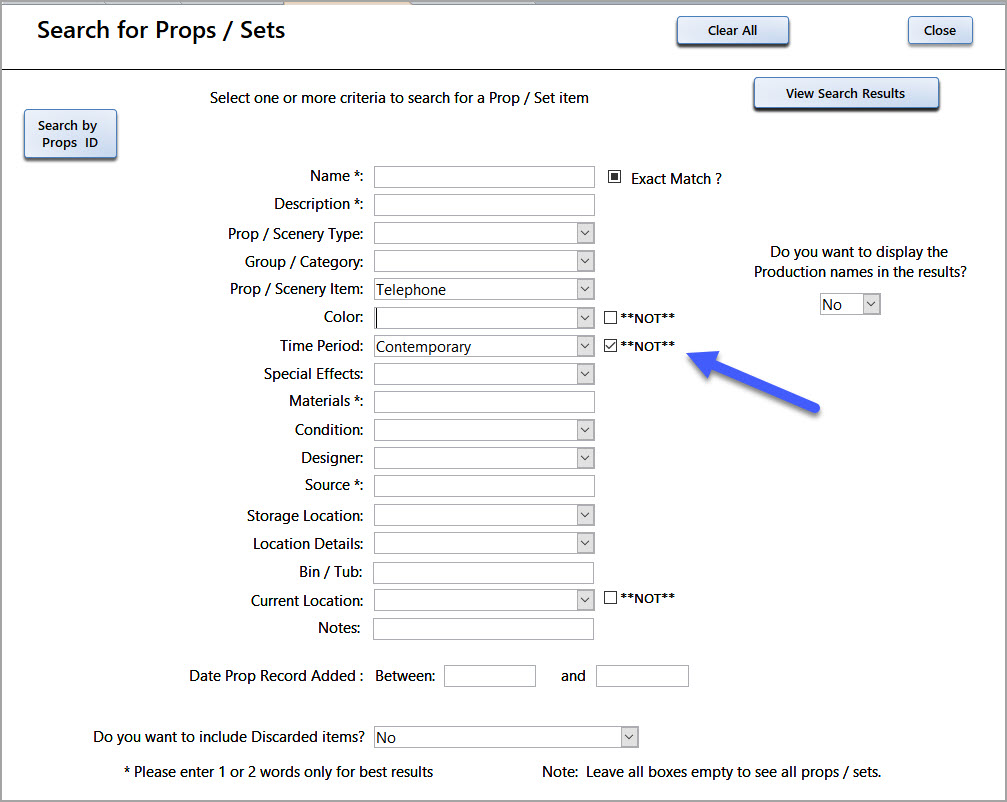
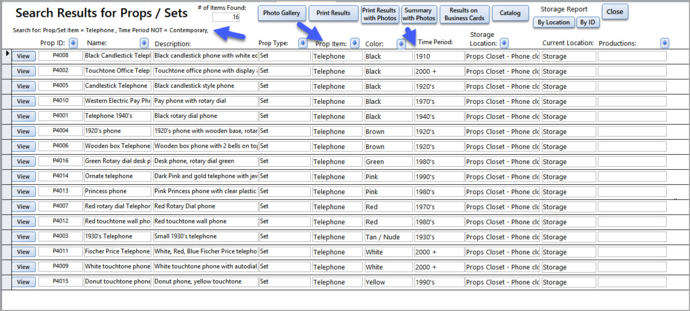
1) New fields - Search by "Notes" and "Not" condition for Color, Time Period and Current Location. For example - you want to search for telephones that are not 'Contemporary'. You can enter "Contemporary" in the Time Period field and check the "NOT" checkbox. This will give you all phones that are from time periods that are not contemporary.
Checkout / Rentals
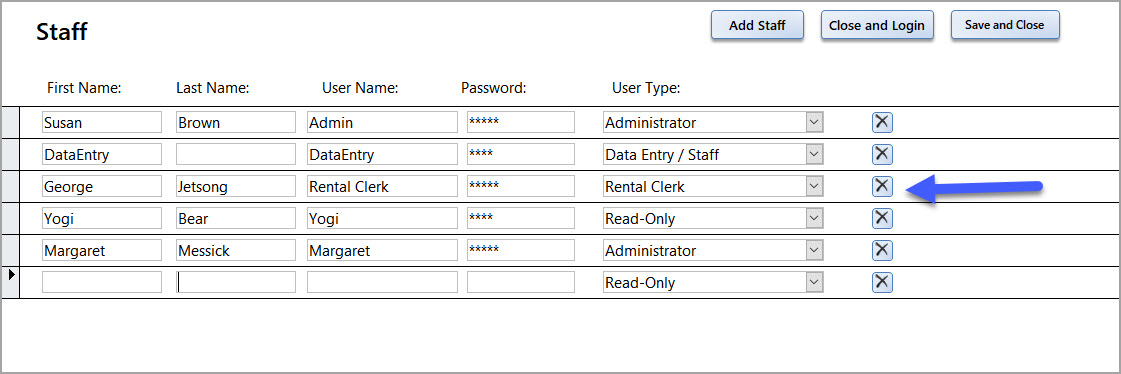
1) There is a new type of staff member - Rental Clerk. The Rental Clerk can Check out and Check in Costumes, Props, and Wigs. They can not edit Costume, Props or Wigs records.
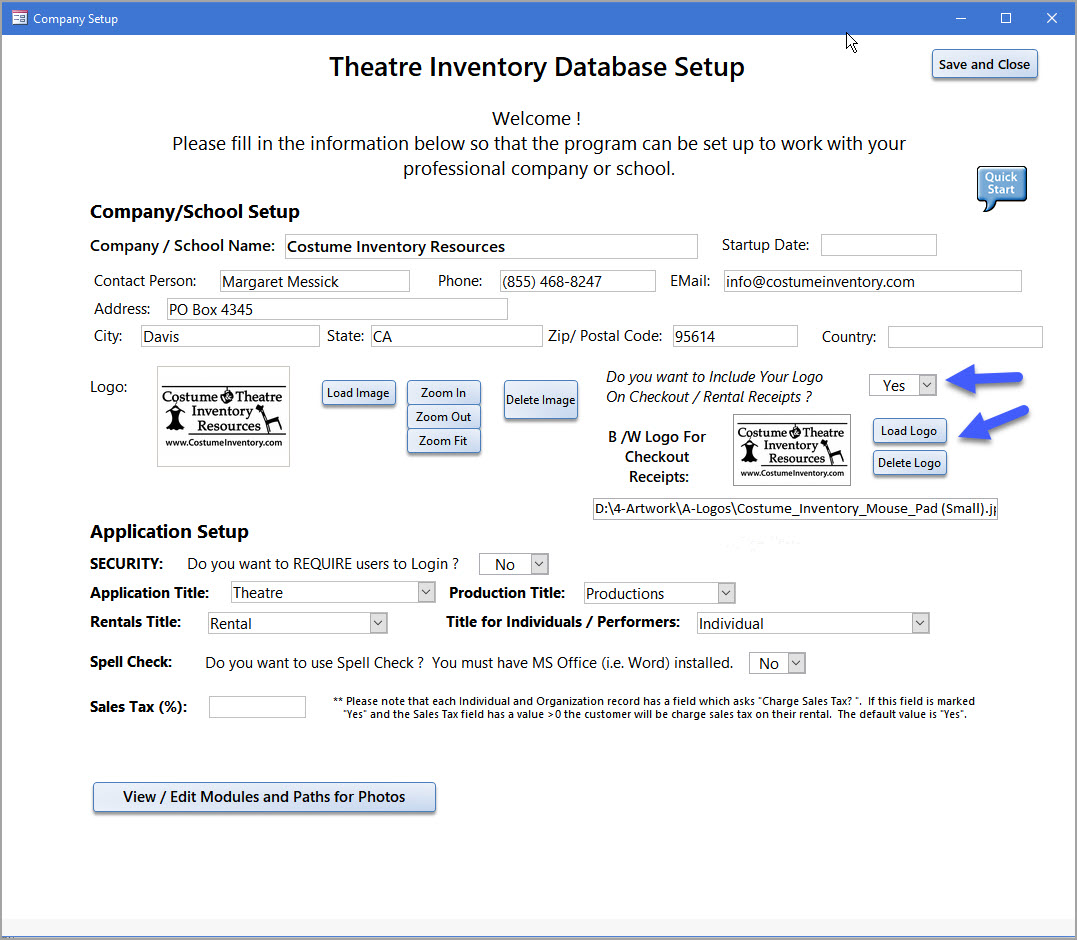
2) You can now include your company logo on the Receipts. You will add a black and white logo (*.jpg or *.png) to the Company/Application Information screen.
There are 2 parts: You need to Select "Yes" for the question - "Do you want to include your logo...".
Then, load the logo (like you load a photo into the costume/prop screen).
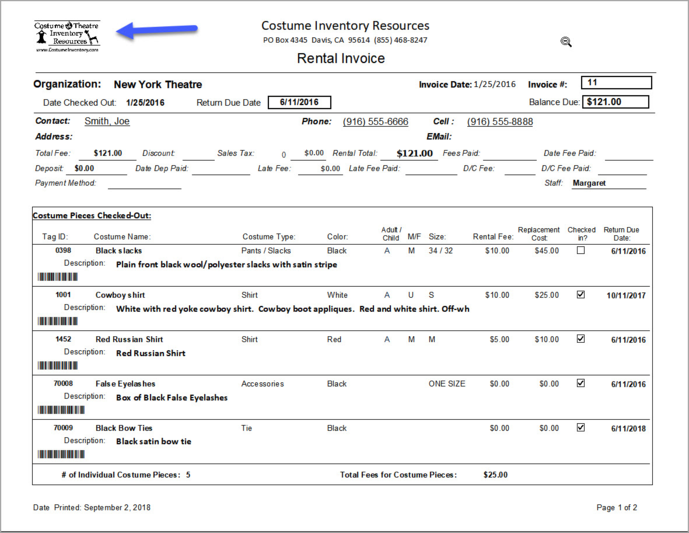
On all the Checkout / Rental Receipts you will see the logo printed in the upper left corner.
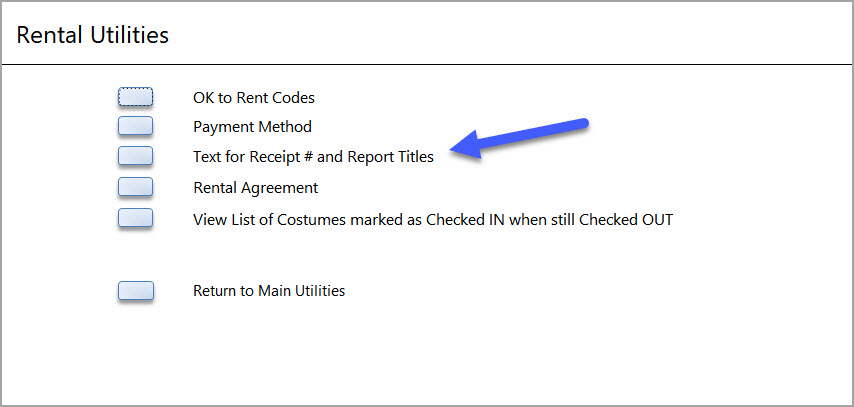
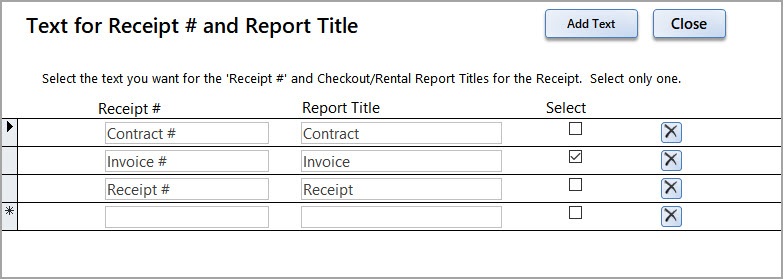
3) You can chose the text you want displayed on the Checkout / Rental screen and receipts. You go to the Rental Utilities and select " Text for Receipt # and Report Titles"
You may add other choices to the list or select one of these. Be sure to select only one as the first one selected will be used.
You can see with "Invoice" selected the titles on the receipt are updated.
Version 8-1 - Released January 2018
Very few changes from 7-12 - a few minor bug fixes.
Version 8-1 - International English - Released January 2018
Updated to include the same features as the Theatre Inventory Database 7-12. All new and revised reports updated to A-4.
Version 7-12 - Released 12-4-17
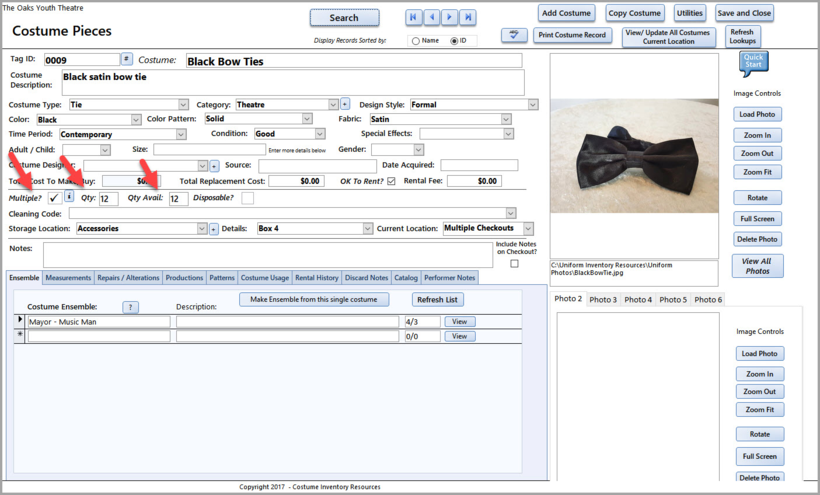
1) Multiples option added
The Costume Pieces form now has the option to mark an Costume Piece as having multiple pieces with the same Tag ID.
New Fields:
Multiple: Yes/No
Qty : Enter the number you have in stock
Qty Available: The number of pieces that are not checked out and are available
Disposable: Yes / No (see below)
Most items in the Costume Inventory are quite valuable and have an individual inventory tag ID. But some items like ties or gloves or other small items are not worth tagging individually but are still checked out to students/performers and need to be tracked.
For those items that are inventoried and may be tagged (but also may not tagged), there is the option to classify them as a “Multiple”. All items, for example a box of ties, will have the same ID number assigned.
On the Costume Inventory screen there is a field called “Multiple ? “ with a  (check box symbol). If the Multiples box is checked then you can enter a quantity, “Qty” amount. If there are 45 ties in the box, then the Qty would be 45. The “Qty Available” field is calculated based on the original quantity entered minus the number of ties that are checked out.
As the ties are checked back in the “Qty Avail” is increased.
2) Disposables:
Some items are purchased by the school/theatre to be distributed with the costume but are not expected to be returned. This may include gloves, socks, leotards, boxes of false eyelashes, etc. These items are considered ‘Disposable’. You may have 50 pairs of gloves at the beginning of the season. You check out 45 pairs to your students and you will have only 5 pair remaining. The Quantity field starts out at 50 but as each pair of gloves (or other costume piece) is checked out the Quantity is decreased by one. On the Checkout screen for the student who checks out the disposable item, the Check-in Date is filled in automatically when the item is checked out so you don’t have to worry about it when the rest of the order is checked back in.
To mark an item as Disposable - it must first be marked as "Multiple" - then you can put a  in the "Disposable" box.
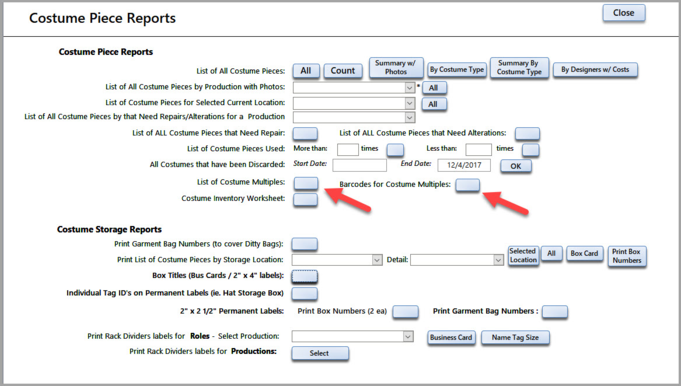
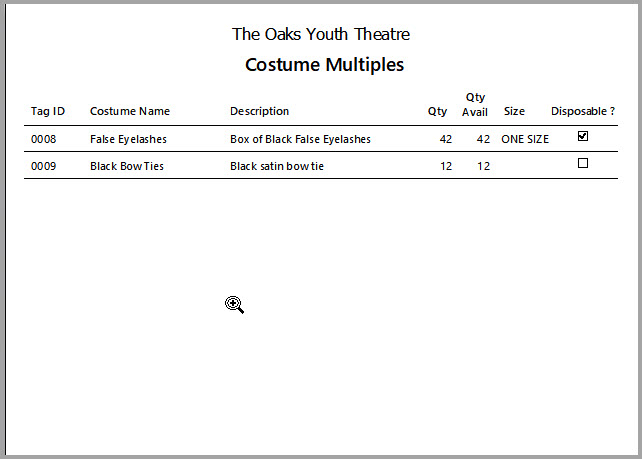
3) New Reports for Costume Multiples:
Two new reports are available for Costume Multiples on the "Costume Pieces Reports" screen:
a) List of Costume Multiples - this is a list of all Costume Pieces that are marked as Multiple.
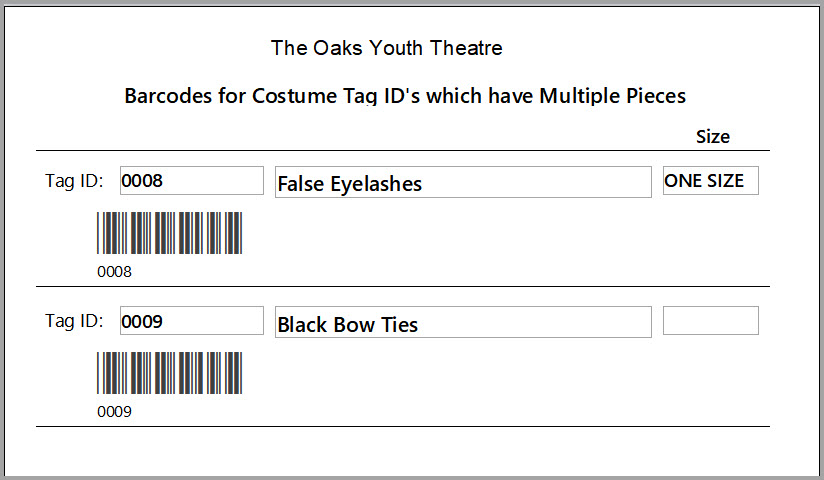
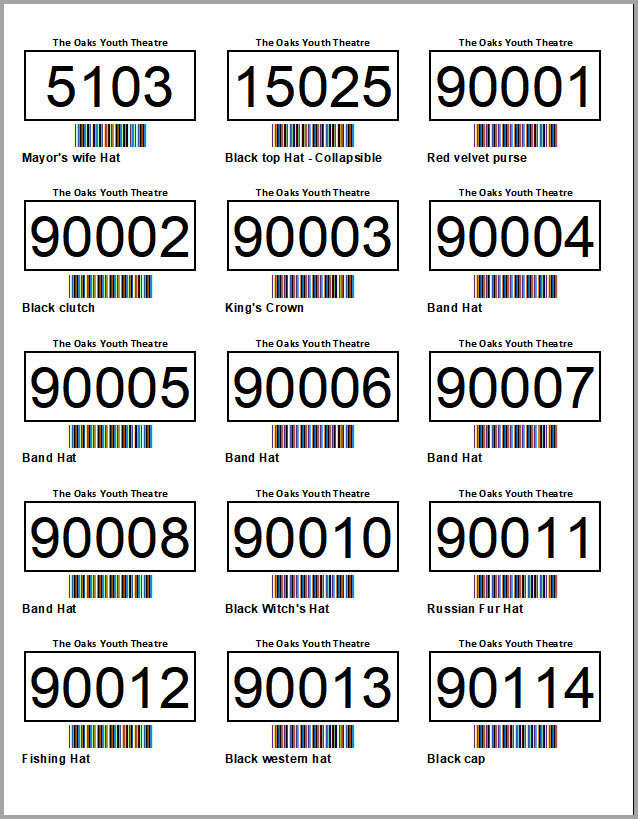
b) Barcodes for Costume Multiples - This is a list of the Costume Multiples and it includes a large barcode
for each Tag ID. This is useful to keep by the Check-Out station so you can just scan the report when you
are checking out a "multiple" and you don't have to type in the Tag ID.
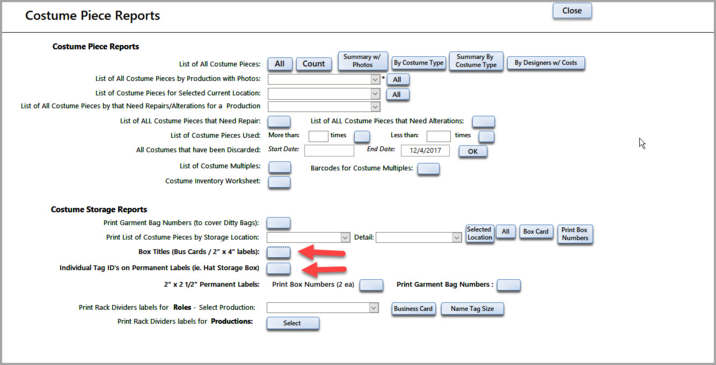
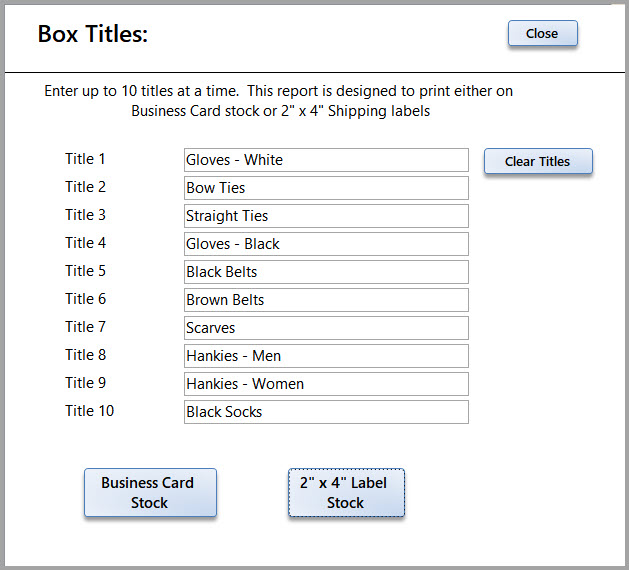
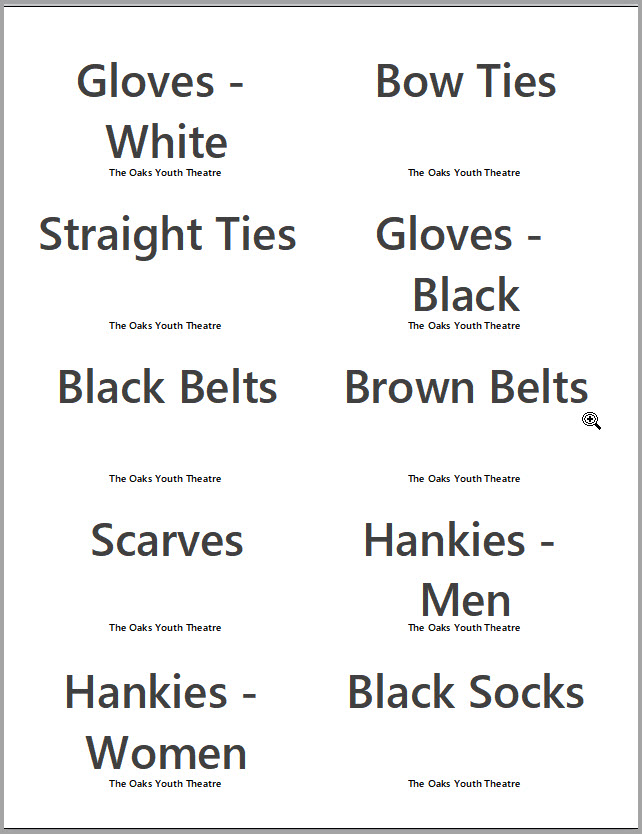
4) Box Labels - two styles on the Costume Piece Reports Menu
a) You can now print a large (2" x 4" or Business Card sized) label to go on the front of a storage box. On the "Costume Pieces Reports" and "Props Reports" screens - look for "Box Titles".
You can enter up to 10 box titles (that is the number that will print on the label stock.
There are 2 options for printing the titles:
1) 2" x 4" Shipping Labels (Avery template 5163). The Avery Shipping labels will stick to cardboard, plastic or metal.
2) Business Card Stock (Avery Template 5371). The cards can be put in adhesive card sized pockets (available from Costume Inventory Resources).
b) Individual Labels for boxed items (Hat Box Labels)
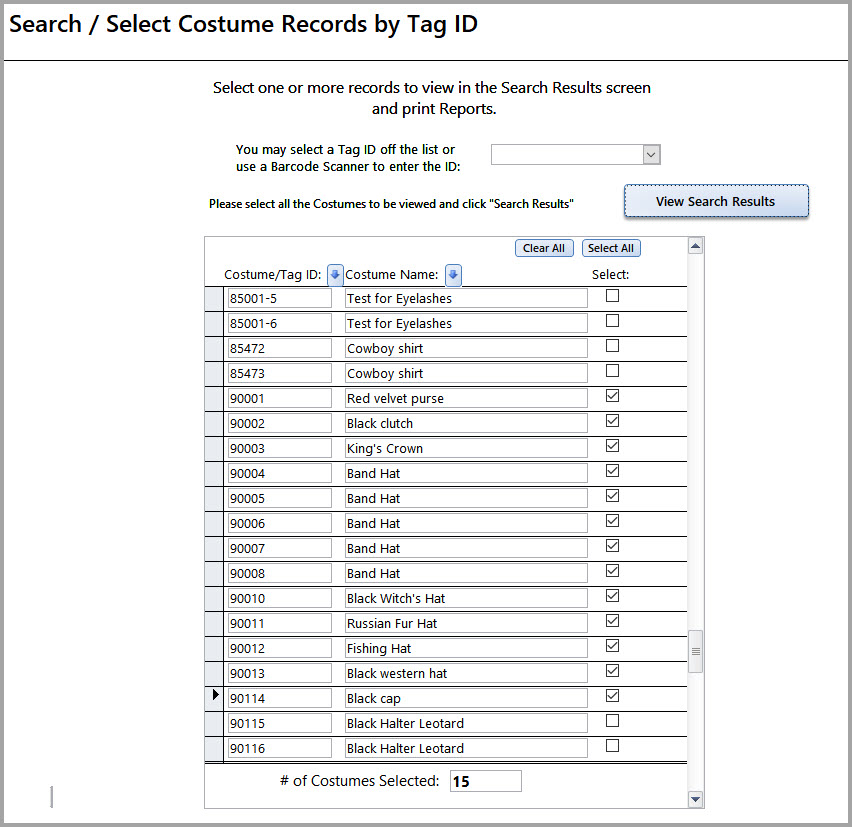
If you keep an item in a box and want an extra label with the tag ID on the outside - with the Tag ID, Barcode and name, you can select multiple Costume Pieces and print a "Hat Box Label"
Select one or more Costume Pieces for the labels. Click on View Search Results.
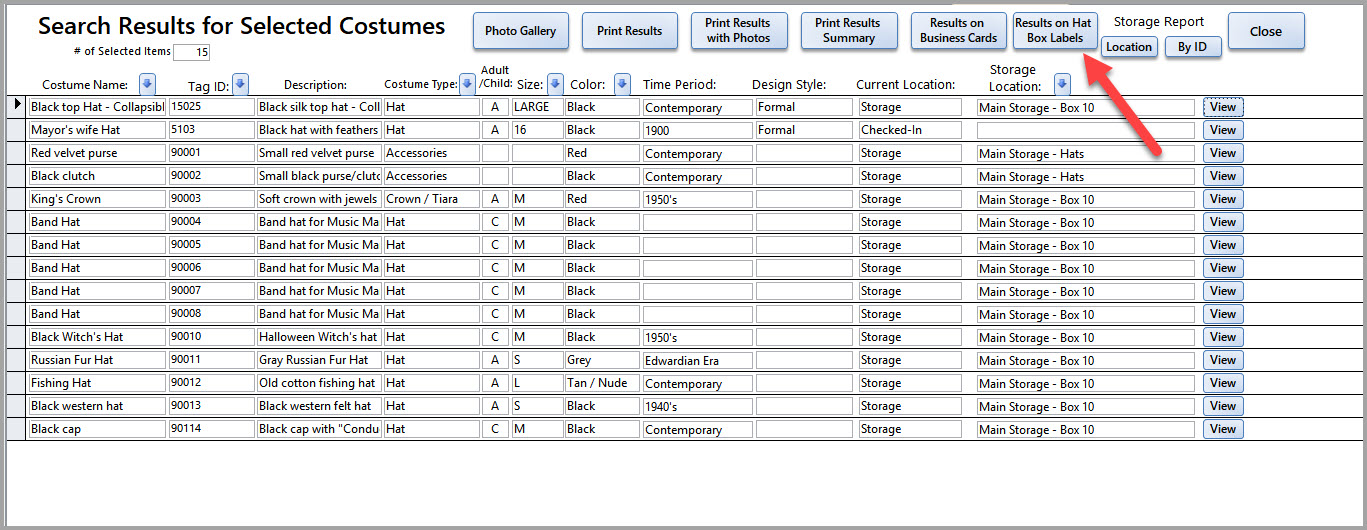
You will be taken to the Search Results screen. Select the button "Results on Hat Box Labels" to print a large label for each Tag ID. The report is designed for Avery 6572 - Permanent Multi-purpose Labels.
"Hat Box Labels" - Avery 6572 Labels - one for each box.
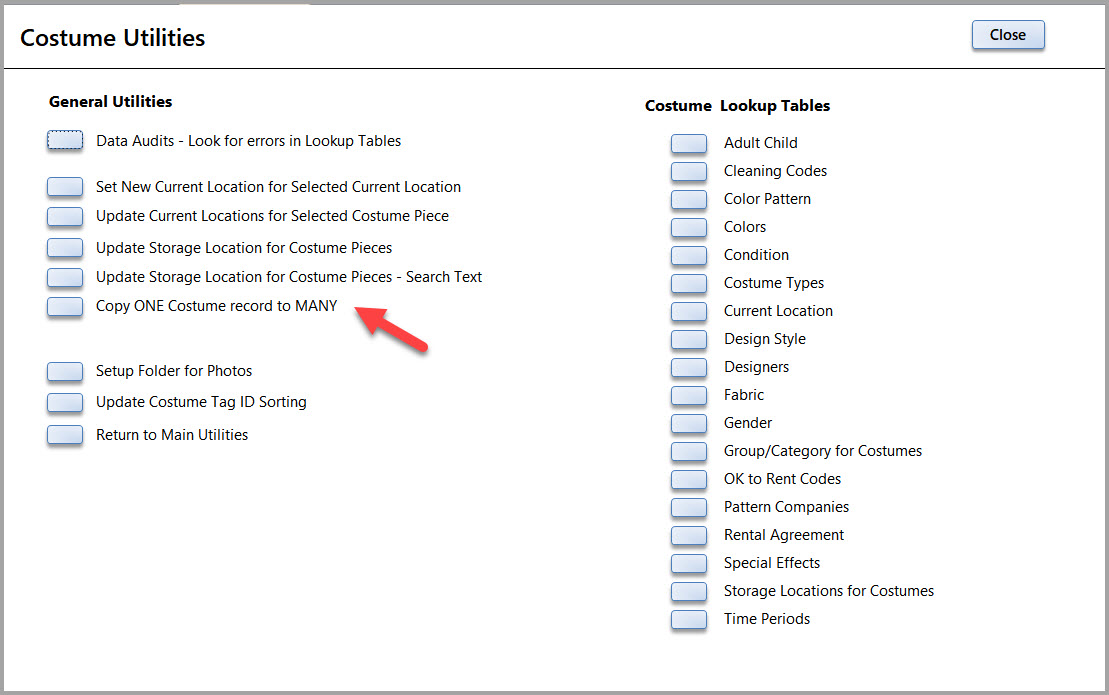
5) Copy data from ONE record to MANY
Have you ever created a record, then copied it several times only to realize that you didn't include enough information on the first record - so now you have a lot of records to edit? The "Copy One Record to Many" function will help you copy the data from the complete record to many other records.
a) Go to the Costume Utilities menu and select "Copy ONE Costume Record to MANY"
b) There are several steps here:
1) Select the piece with the good data. You will see the name, description, costume type and color listed below.
2) Enter in the Starting Number of the records you want the data to go to. Enter the Ending Number - the records must be consecutive to be updated.
3) Select the fields that you want copied to the selected records.
4) Click "Ok - Update". You will be asked to confirm the update as there is no "undo".
Version 7-10 - Released 10/20/17
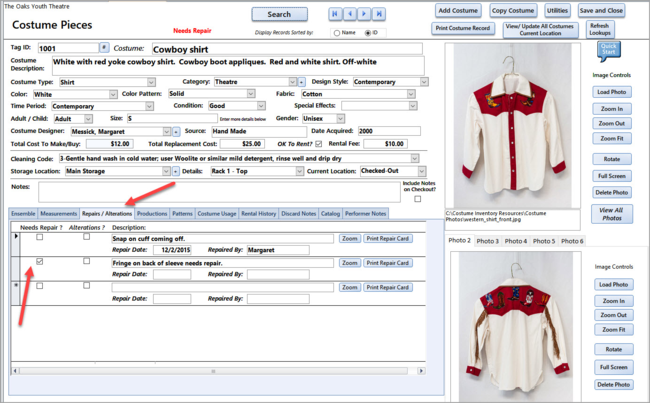
1) Costume Pieces now have a Repair / Alterations History.
You can create multiple repair and alterations records for each costume piece. Look for the Repair / Alterations tab on the bottom half of the screen.
Note - if you want to upgrade to this version of the database your current Costume Repair data will be moved to the Repair History tab.
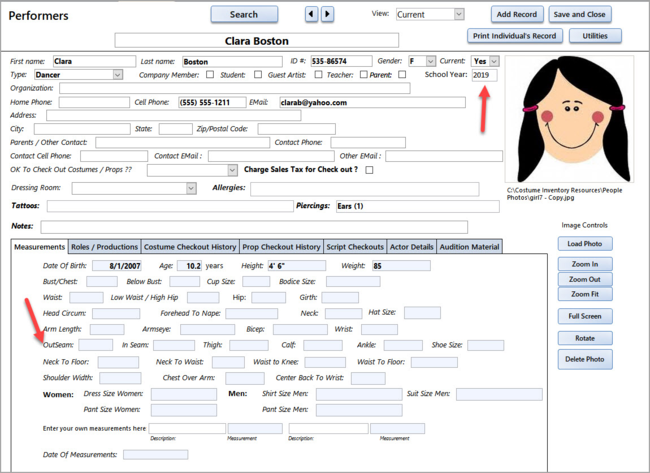
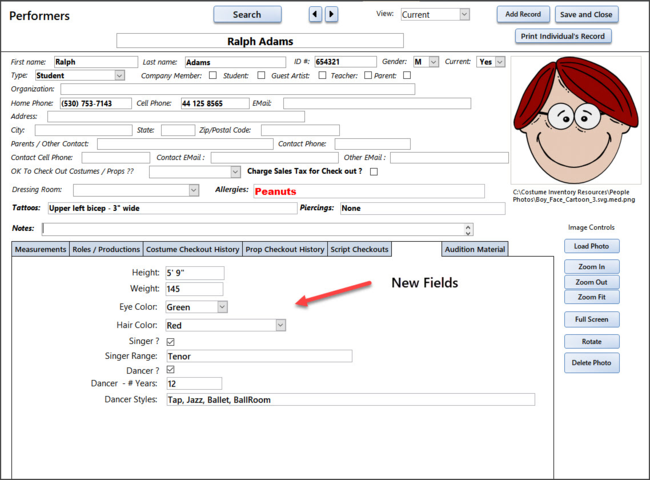
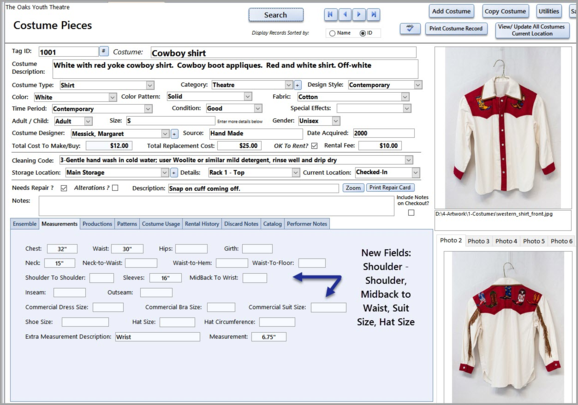
2) New Fields have been added to the Performer record: The School (or Graduation) Year and the measurement field - OutSeam.
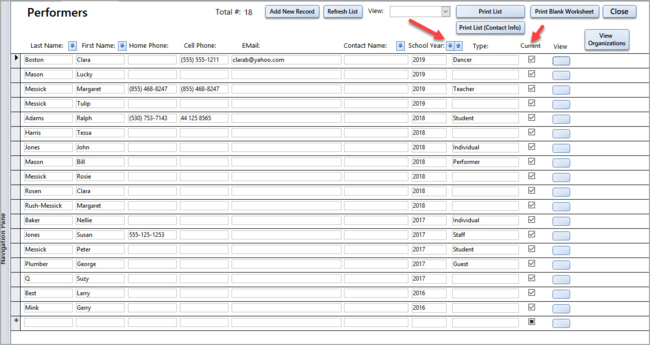
3) The Performer List shows the School Year and it can be sorted. If you want to sort out the students who have graduated - you can sort the list in descending order and clear the "Current" field for the students who have left.
4) You can print a blank worksheet for your Performers/Students and enter their measurements. Once you have gathered the data for your performers you can enter it into their database record.
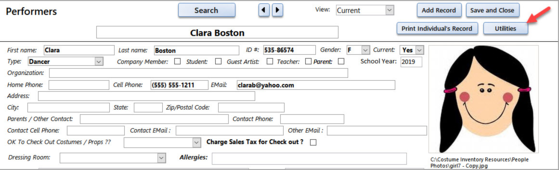
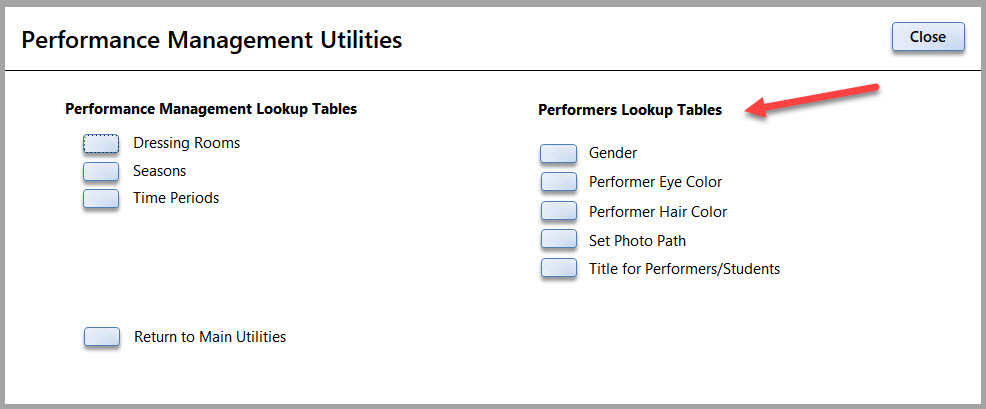
5) There is a new Utilities form for Performer lookups. From the Performer record you can select Utilities. You can update the Gender options, Eye and Hair Color options and set the Drive/Folder path for the Photos.
Version 7-8 - Released 9/12/17
1) Costume Piece Search has new fields to search on: Date Checked Out, Measurements (Chest, Waist, Hip, InSeam).
2) Costume Search Results has 2 views.
If you do not search on any Productions or Ensembles - you will see a screen with out the Production/Role and Ensemble fields.
If you do search on Productions or Ensembles then you will see the Production and Ensemble fields.
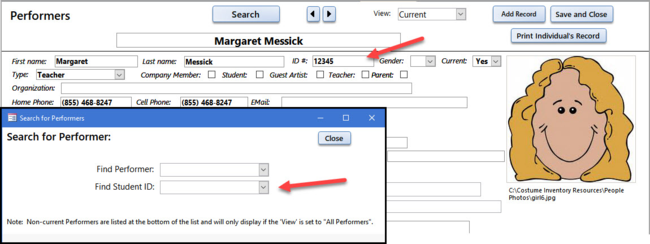
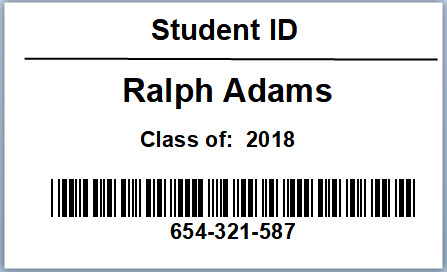
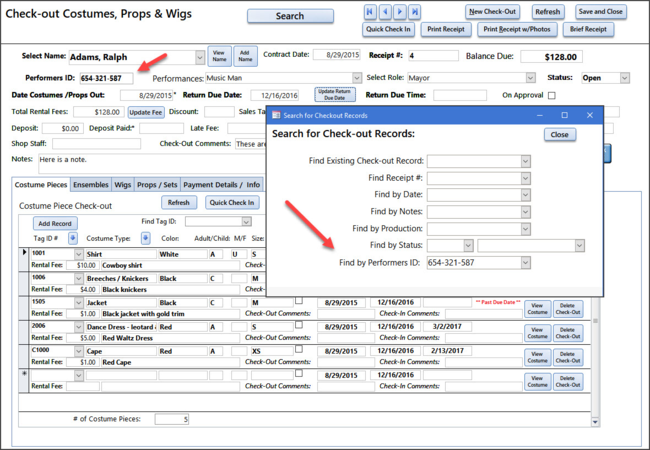
3) The Student/Performer record can now be searched on Student ID.
4) New fields added to Performer Record - Eye Color, Singing abilities, Dance, etc.
5) The Checkout Records can be searched by Student ID. For example: If their Student ID is entered in their Performer Record - and - they have a Student ID that has a Barcode on it you can do a put your cursor in the Find By Performer ID box, scan the Student ID barcode and find their Checkout Record.
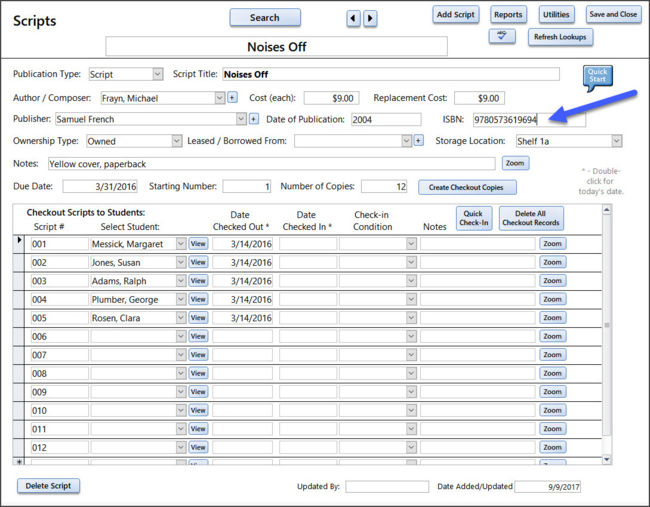
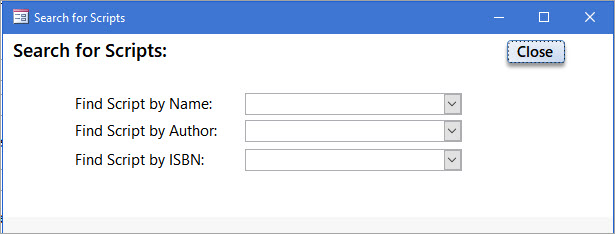
6) Scripts screen now has a field for ISBN #. You can also search for a script based on the ISBN number.
Version 7-5 - Released 5/30/17
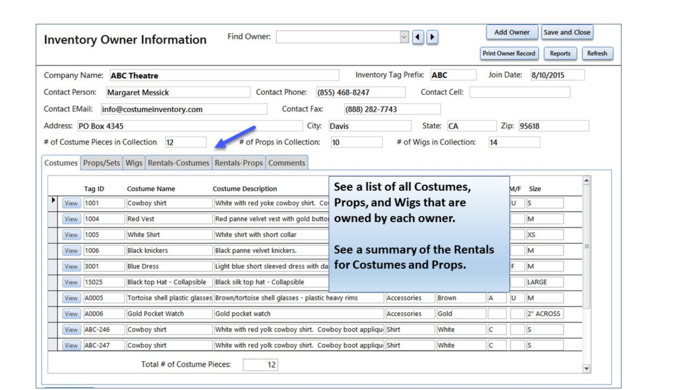
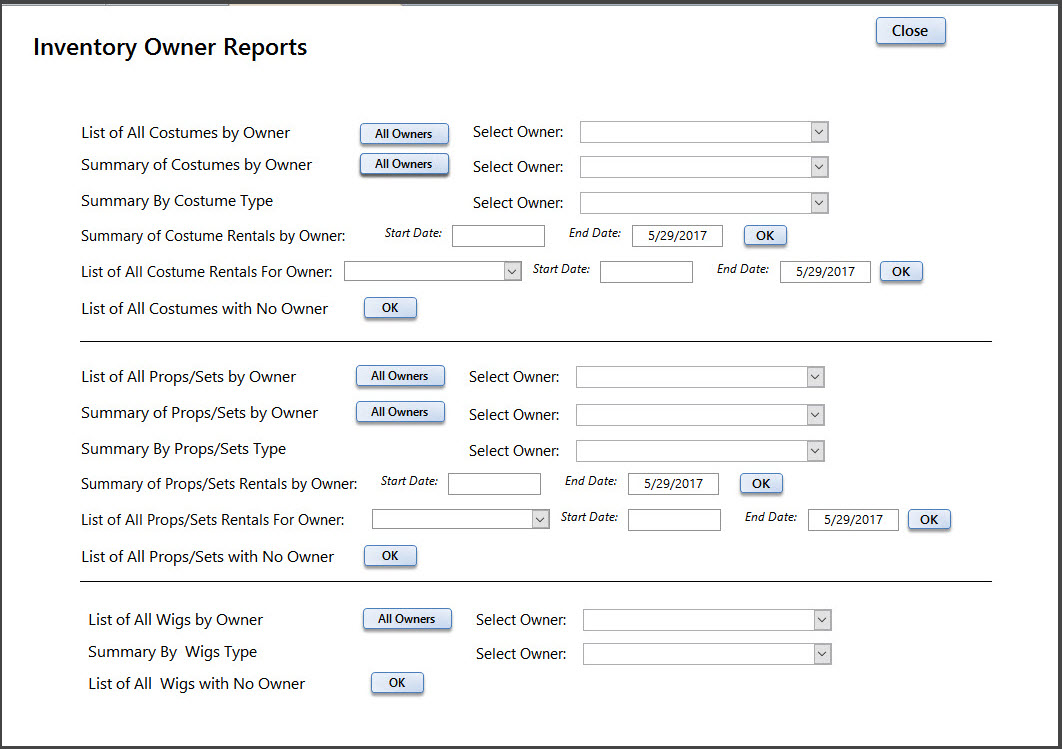
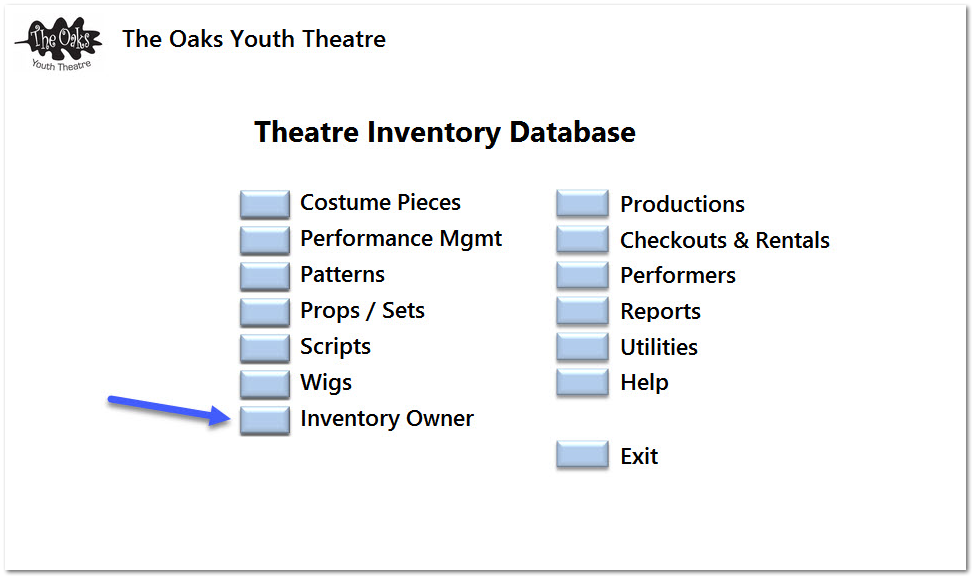
1) The Inventory Owner module has been expanded to include more ways to view the Inventory Owners, print reports and link to Wigs.
a) The Inventory Owner is now a module on the main screen (when you install it).
b) The Inventory Owner Information screen now has a summary count of all costumes, props and wigs that are associated with the owner.
There is also a list of each item in the Costume, Props and Wigs tags. There is a summary of the Costume and Prop rentals for the owner's costumes and props.
c) New reports are also available:
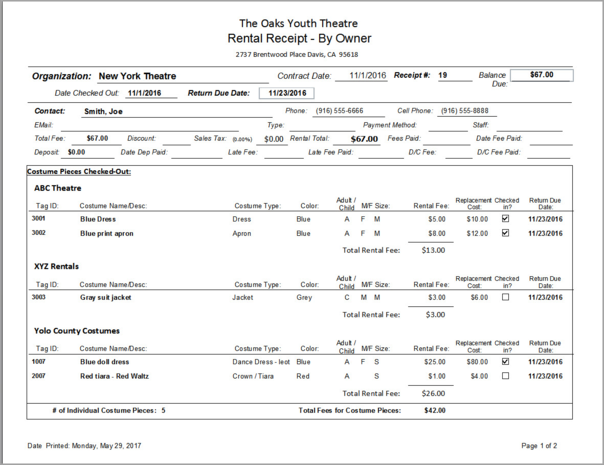
d) The Rentals and Checkout screens have a new Receipt that will break down the rental by Inventory Owner.
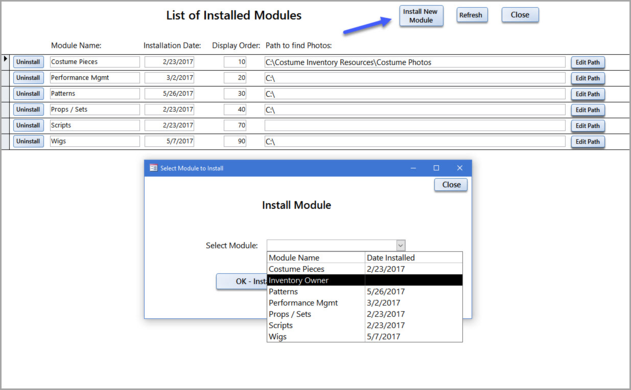
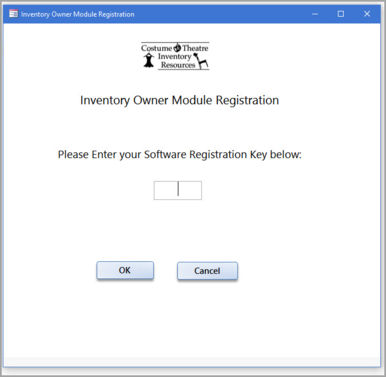
e) To Install the Inventory Owner Module -
1) Go to the Utilities Menu, Select "View List of Installed Modules". Look for the Install new Module button.
2) Select the "Inventory Owner" option.
3) You will see the Inventory Owner Software Reg screen. Enter the Registration Key provided by Costume Inventory Resources when you purchased the module.
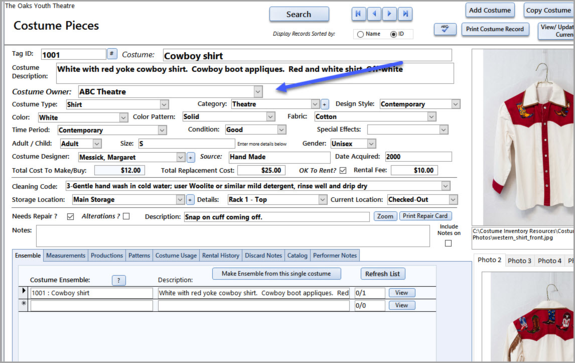
4) The Inventory Owner option will be listed on the Main Menu. When you view a Costume, Props/Sets or Wig screen you will see the Inventory Owner field near the top of the screen.
2) Patterns -
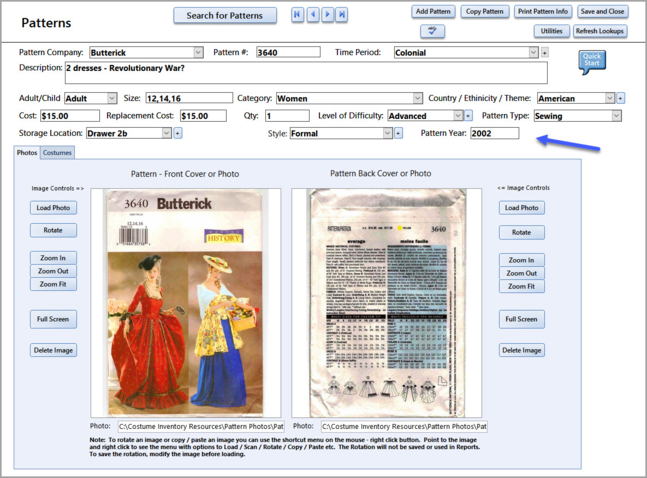
a) New fields - The Pattern screen has a new field for Pattern Year. Since the Pattern companies are using the same pattern numbers over it is a good idea to have the year of the Pattern listed so if you have two - you know the year when it was published.
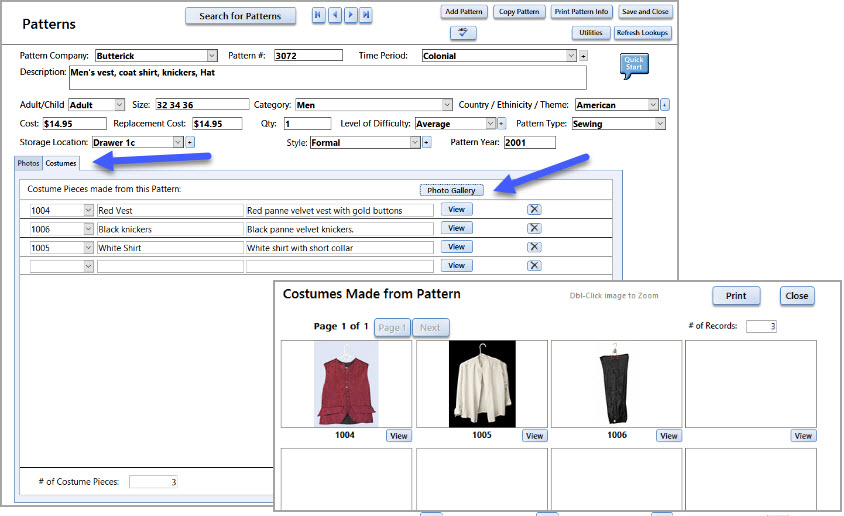
b) The Costumes tab on the Pattern screen now also has a Photo Gallery so you can see all the costumes you have made from (and linked to) a Pattern.
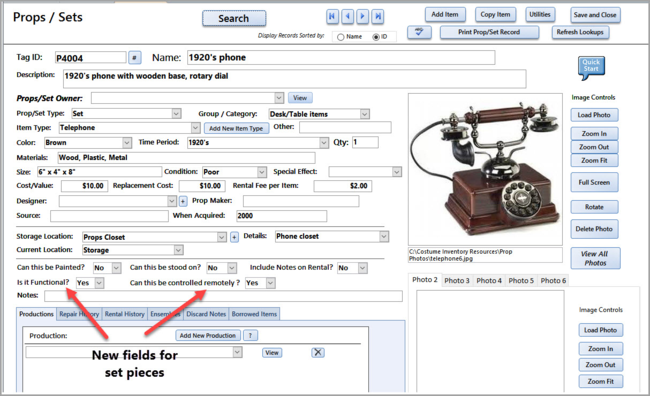
3) Props/Sets - New fields
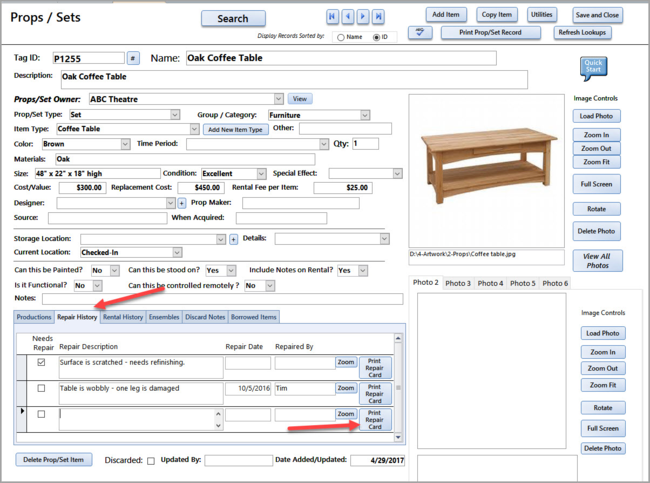
1) Repair History - now you can list all repairs in a tab at the bottom of the screen. You can print repair cards to help the technician know what needs to be repaired. All the repairs are listed on the Props/Set Record Report.
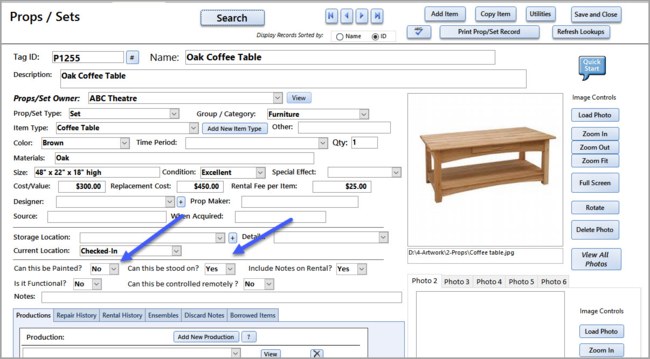
2) Four new fields have been added to the Props/Sets record. They are designed to help with Rentals and Productions.
a) "Can It Be Painted ? " and "Can it be Stood On?" are there to help you inform any one who might rent or use the item whether it can be painted (stained, recovered, etc.) and whether it is strong enough for someone to stand on it. You may not want your Oak table to come back painted purple and in pieces after someone stood on it and broke it. You have your choice of whether these two fields are printed on the rental receipts.
b) "Is it Functional? " and "Can it be controlled remotely ?" are fields to help you when plan a production and want to know if the phone can ring or the clock hands move or the light turns on. As more set pieces can be controlled remotely by the Sound or Lighting directors it is good to know if this can be controlled. More info on how to control it can be entered in the Notes or Description fields.
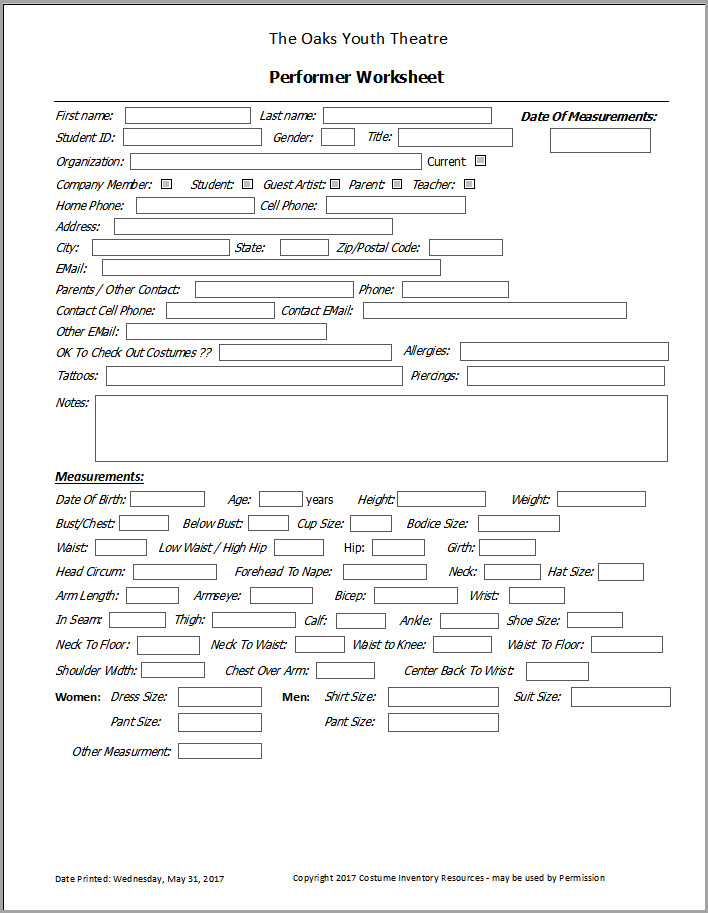
4) Performer List and Worksheet
The Performer list has been updated to include 2 new features:
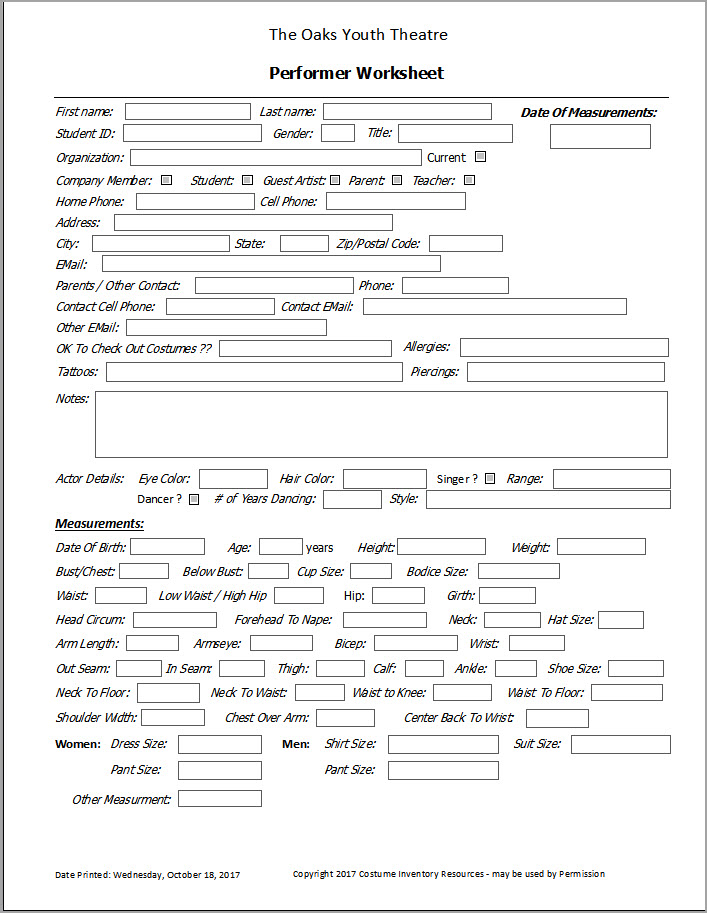
a) Performer Blank Worksheet
The Performer Blank Worksheet is a worksheet to use when you taking initial measurements of your performers. Once the data is filled in by hand the data can be entered easily into the Performer records.
b) The second addition is the "View Organizations" button to go directly to the list of Organizations (for Rentals). (See above). The Organization List has a similar button to go directly to the Performers (Individuals/Students) screen.
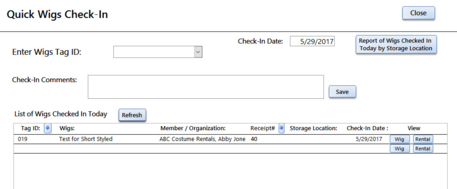
5) Wigs - Quick Check-in Updated - The Wigs Quick Check-in wasn't quite right but it is all fixed now.
Available in March 2017, Version 7-2 has the following new features:
Costumes
1) New Costume Piece Measurement fields.
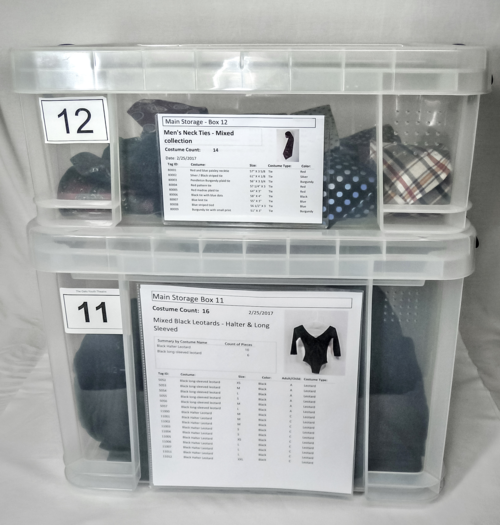
2) Box Reports Updated - There are now 5 different styles of Box Reports that can be printed for a storage box or bin.
These box reports are helpful to place on the front of a box or bin. It is easy to view the report to see what is inside. As contents change it is easy to print a new report. (Costume Inventory Resources now carries the 4" x 6" adhesive pockets to hold the 4" x 6" Box Report.)
Performance Management
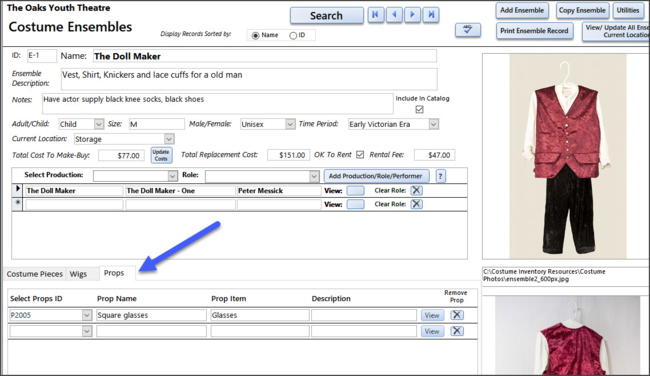
1) You can now add Wigs and Props to an Ensemble record.
2) Performers screen has new tab for Audition Materials:
3) New Report - Select to view Ensembles updated by selected dates.
a) Do a Search on Date Updated from the Search Menu and print the results
b) Select the date range (start and end dates) on the Ensembles Reports screen and print the report with or without photos.
4) New Report - Print all costume pieces assigned to an Ensemble in a Production - by Cleaning Code. This report will help you after you have finished a Production and want to gather everything up and get them cleaned. The report is sorted by Cleaning Codes so all the Dry Cleaning is listed together, the Machine wash, etc.
5) New Report - Print a list of all Costume Pieces assigned to an Ensemble in a Production - by Needs Repair / Alterations. So once the costume pieces have been assigned to the Ensemble and those Ensembles assigned to the Production you can print a list of everything that is marked for 'Needs Repair' or 'Needs Alterations'.
Props
1) You can add Props to Ensembles and view the Ensembles on the Props screen. The Ensembles tab only shows if the Performance Management module is installed.
Scripts
New Report: All Scripts by Author. The report will list all the Scripts (Scores, etc) by all authors or a selected author.
Quick Check In
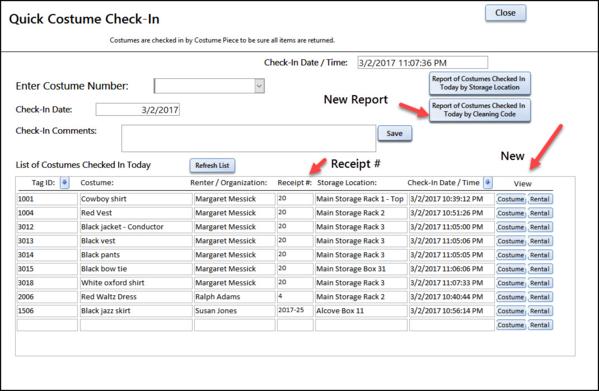
The Quick Check-in screens for Costumes, Props and Wigs have 2 new lookup buttons and the Receipt # displayed. After you check an item in you can view the Item (Costume Piece, Prop or Wig) or view the Rental Receipt. You can also sort the records by Tag ID or by Check-In Date/Time.
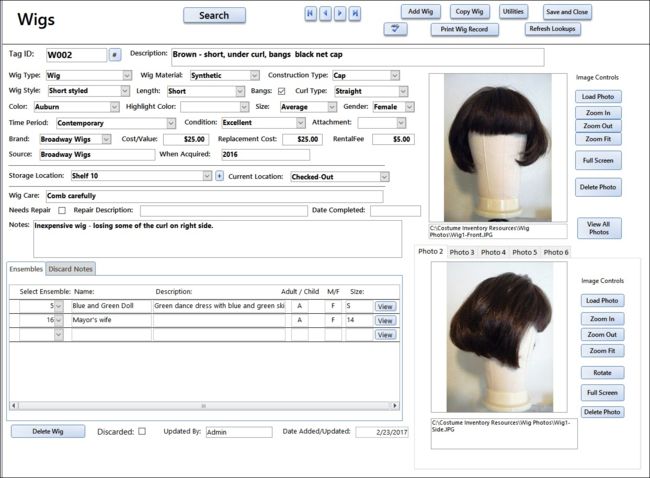
Wigs - New Module
Features:
1) Inventory Wigs, Hair Pieces, Facial Hair
2) Link up to 6 photos
3) Add Wig to Ensemble if the Performance Management module is installed.
4) Do Searches and print reports and view the Photo Gallery
5) Check-out Wigs to Individuals and Rent them to Organizations
6) Update all the Lookup tables with values that you need.
7) Print a variety of reports from the Reports Menu, Search Results and the Wig Inventory screen.